Following on from Episode 309 when we looked at what I take on a portrait shoot, today we’re going to look at what I take on a nature and wildlife shoot. I’m planning on going away for a few days this week, so I figured as I planned my shoot, I’d walk you through what I take with me.
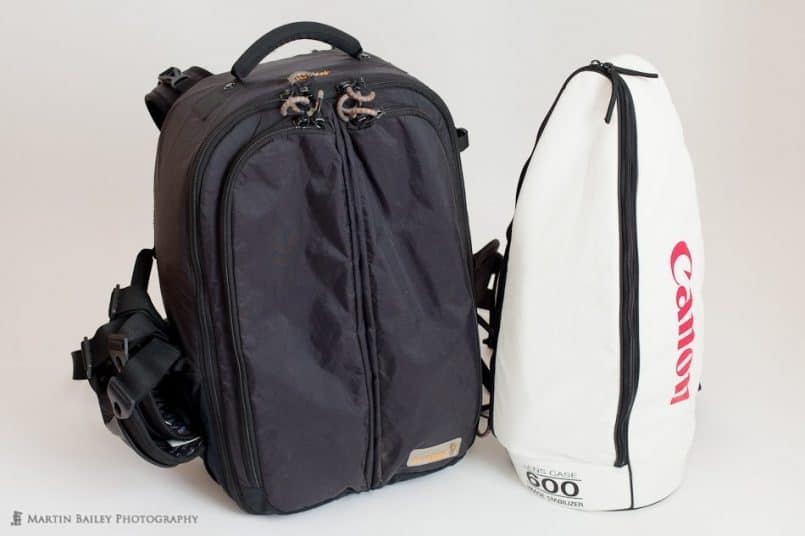
For my portrait work where I’m most often either working close to the car or even if I travel by public transport, I’m usually working with a client nearby, I have started to use the ThinkTank Photo Airport Security II bag that we looked at in Episode 309, but when I’m going to be out in the field, and probably will end up walking some with my gear, I use the Guragear Kiboko bag. This is a 30L bag that holds an incredible amount of gear, despite not really being that big a bag, and it’s very light as well, designed for the traveling photography. You can fit the 600mm F4 lens in the Kiboko as well, but it takes up pretty much one side of the bag, so I generally take my 600mm F4 lens in a Canon bag made just for this lens, as we see in this photograph (below).
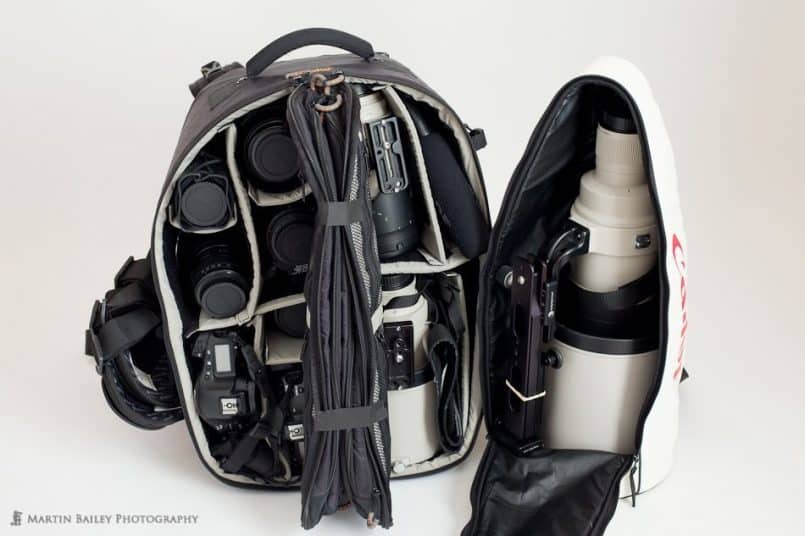
Because the Kiboko bag is separated down the middle into two compartments, this photo (below) of the contents of the bag is not the easiest to look inside, but I taped the two compartment flaps together, so we can take a look.
You can see from the size of the 600mm to the right of the Kiboko that it’s possible to put the 600mm into one side of the Kiboko. When I fly with the 600mm, I generally put it into the bag, and put the cameras and bodies that I no longer can fit into the bag into my pockets and my laptop carry on. I also put the white bag for the 600mm into my checked luggage though, and then switch them out when I get to my location.
The things attached to the side of the Kiboko are my knee pads. I generally keep these with me for nature photography, because I never know when I’m going to want to kneel for extended periods for macro work, or a low angle, and on uneven ground, this can get pretty uncomfortable, so the knee pads help.
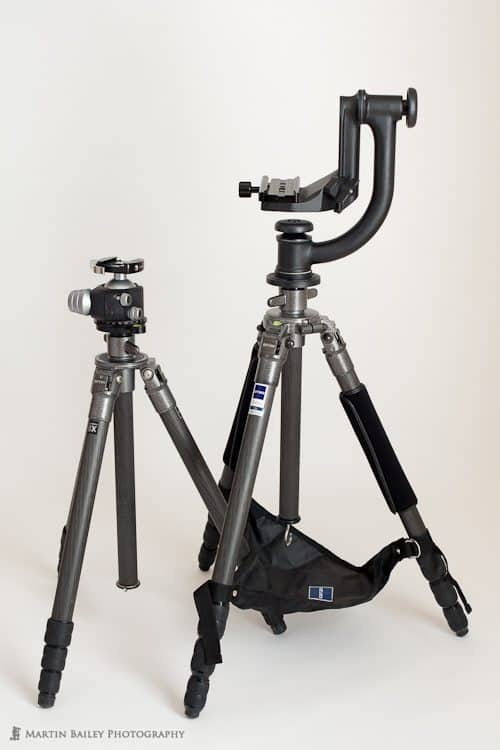
I also generally put the smaller of these two tripods on the side of the Kiboko bag, but when traveling this can tip me over the weight limit for a carry on, so I often put them into my checked luggage. I like to take both tripods when I can, because when I’m using the 600mm F4 lens, I use a second tripod with a Wimberley gimbal head fitted, so that I can track flying birds or moving animals more easily. The left of the two tripods here (right) is fitted with the Really Right Stuff BH-55 ball-head, and the second with the old Wimberley Head. There is a new version of the Wimberley Head available, which is a bit lighter and more rigid apparently, which I’d like to try, but I haven’t really been able to warrant buying the new version yet.
When I’m using all of this gear, I generally carry the Kiboko with the smaller tripod attached on my back, using the stow-able shoulder straps and waist belt, and the 600mm in it’s white case over one shoulder, and a second tripod in the other hand or over the other shoulder using a detachable strap. Needless to say I don’t walk miles and miles like this, but I can get a fair distance without it feeling too heavy or uncomfortable.
By the way, the pouch thing you can see hanging from the legs of the larger tripod is a stone-bag. Originally, as the name suggests, it’s purpose was to put stones in to weigh the tripod down and make it more stable, but I use it for putting bits of gear in, such as extenders and when I’m not using the Black Rapid Double Strap, I sometimes put another camera with a 24-70 or 70-200mm zoom lens attached into this pouch. It sags just enough so that things don’t drop out, but you can get at them easily enough as well.
If the total weight that I’m traveling with starts to get too much, I do sometimes just take one tripod, and the Wimberley Head separately, and then switch them out in the field, depending on how I’m going to be using the tripod. If I’m doing wildlife work, I generally shoot handheld with my shorter lenses, so I rarely use two tripods at once, so this isn’t a big deal. Sometimes though, especially in cold conditions, it can be almost impossible to unscrew the heads, so I do like to have both tripods if weight restrictions don’t get in the way.
I often find that even if I’ll be mainly shooting wildlife, I end up doing a certain amount of landscape work as well, and I pretty much always use a tripod for landscape work, and the Really Right Stuff BH-55 is the best option for that in my opinion. It’s an amazing ball head.
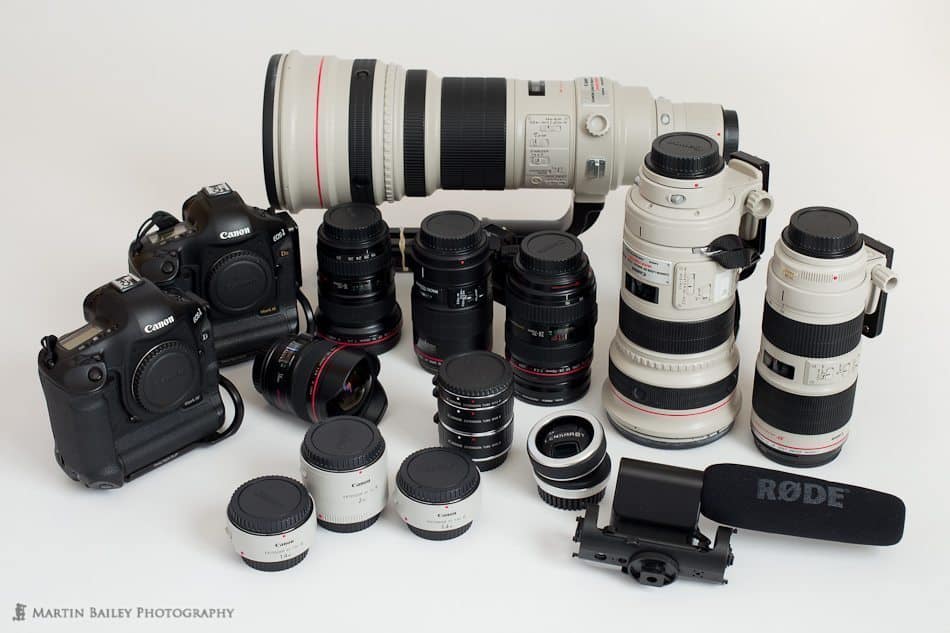
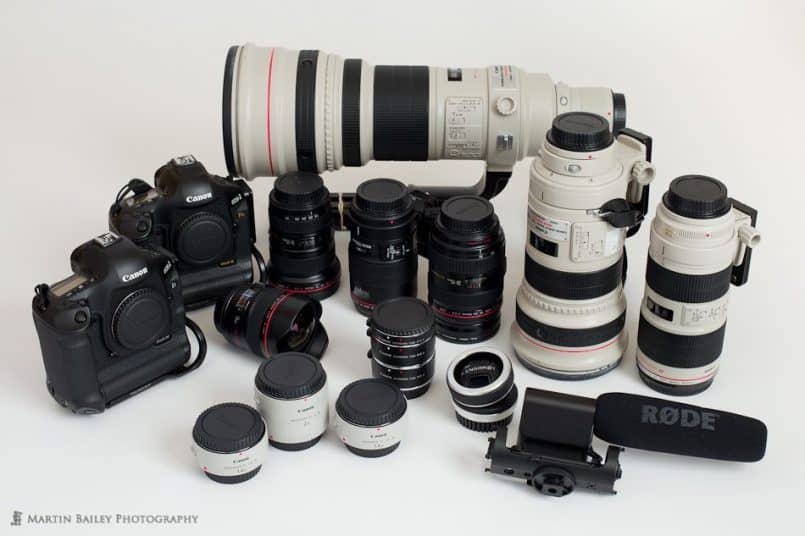
OK, so let’s take a more detailed look at what’s in my bag (below). Along the back there is the 600mm F4. You might have noticed on the earlier photo as well, but I always keep the Long Lens Support from Really Right Stuff attached to this lens. Long lenses like this vibrate as you release the shutter, especially if you end up having to shoot at shutter speeds of 1/100th or a second or lower, so being able to support the front of the lens as well as the back with this support, really helps to reduce this vibration. I have some photos of this long lens support in action in a blog post for Episode 198 if you want to see more.
To the left are my two main camera bodies. The one towards the back is the Canon EOS 1Ds Mark III, and the one in front of that is the 1D Mark IV. The lens laying down in front of the 1Ds is the 14mm F2.8 L lens, which I generally use for ultra wide angle landscapes, but also like to point this lens up into trees or get down really low with this lens, as it gives a really wacky perspective.
Behind the 14mm, is the 16-35mm F2.8 L lens, at then the 100mm Macro L lens is in the middle of the three black lenses in a line, then the 24-70mm F2.8 lens is to the right of the three. I like to have a Macro lens with me, but unless I am going out specifically to do macro work, I don’t take my 65mm MP-E 1-5X macro lens or my macro strobes. In front of the 100mm Macro though is two 25mm extension tubes and a 12mm extension tube. I keep these all nested together like this to save space, and I have used all three of these at once to get in much closer than life-size with the 100mm macro lens. There’s no glass in these tubes either, so they don’t weigh a lot.
In front of all of this is two 1.4X Extenders and a 2.0X Extender. These are the recent Mark II extenders which are quite an improvement over the original versions. One thing I was disappointed with though recently is that it seems you can’t nest the 1.4x Extender with the 2.0X any more. The old versions used to allow this, which is how I shot my Moon video, so I was not very happy when I tried this recently to shoot the Lunar Eclipse, only to find that it’s no longer possible. Otherwise, these are great Extenders, and work really well with the new 70-200mm F2.8 L lens, which we can see to the right of this shot. The 70-200mm F2.8 L lens is also an big improvement over the original 70-200mm lens. I covered this in my review of this lens, in comparison with the old version in Episode 235 so I won’t go into detail today. By the way, I have two 1.4X Extenders, because I often find myself needing one for each camera body. I don’t use the 2.0X Extender enough to need this, but the 1.4X get used quite a lot, and so I like to have two with me.
Basically the zoom lenses that I’ve just mentioned take me from 16 to 200mm and I can get out to 14mm with that first prime lens that we looked at.If I drop the Extenders onto the 70-200mm F2.8 lens, I can get a 100-280mm lens, or a 140-400mm lens, if I use the 2.0X Extender. With the Mark II versions of these Extenders both of these are very workable combinations, so I don’t shy away from using the Extenders with my 70-200mm lens.
They also work great with the 300mm F2.8 L lens that we can see to the left of the 70-200mm F2.8. This is the only of the lenses that we see here that I have not upgraded to the Mark II, that was released earlier this year. I am already incredibly happy with the image quality, as this lens is as sharp as they come, so I don’t really see a point in spending the money to upgrade. The extra Image Stabilization ability and a reduction in weight is welcome, but not enough to replace a perfectly good lens. In fact, the main reason that I would replace this lens, is because the Image Stabilization switch on the older version sticks out so far that I sometimes catch in and turn it off, so as you can see in the photo, I have the IS switched taped up in the on position, to prevent this. The new model doesn’t protrude as much so this risk is apparently greatly reduced. I’d like that a lot, but not enough to warrant the upgrade, unless Canon released a camera body with enough megapixels to out-resolve this lens.
The other things we see in this image are the Lensbaby Composer and RØDE Video Mic. The Lensbaby is small and pretty much goes with me everywhere. I love that little lens. The RØDE Video Mic usually ends up in my bag, even when I don’t necessary intend to shoot video, as you never know when a scene is going to lend itself to a short video clip.
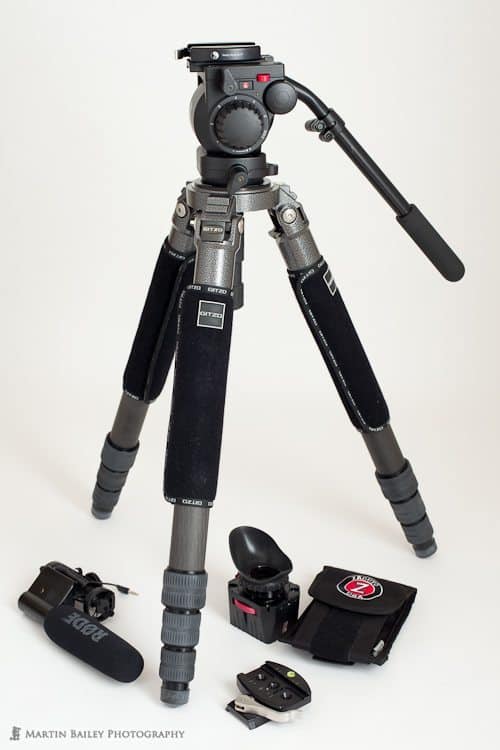
If I’m heading out to shoot video, or if I’m traveling by car and weight isn’t such an issue, I’ll usually also pack my 5 Series Gitzo 6X Tripod with Manfrotto Video Fluid Head, which gives me the ability to smoothly pan around, for much higher quality video. I also have a second plate for this Video head with an RSS Quick Release Clamp mounted rotated by 90 degrees, so I can use both lenses with a plate on the lens that generally point forwards, or mount the body directly when I’m using shorter lenses. There are better solutions available now, but this system works for me. If you are interested, I went into detail on this in Episode 239 of this Podcast.
I also pack my Zacuto Z-Finder too, which enables me to see the LiveView in enough detail to manually focus as I shoot video, without any more specialist video gear, for the time being at least.
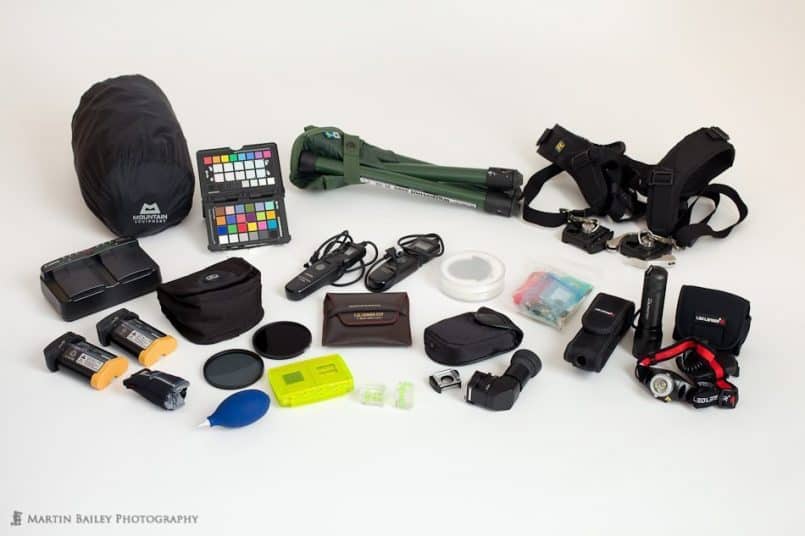
To prevent the inner pockets of the Guragear Kiboko bag from bulging making it even more difficult to photograph the inside, I didn’t pack any of the other miscellaneous things that I take with me, but I did lay them out to talk you through them. Not all of these go into my bag. Some go into the pockets of my photographers vest, and some like the batter charger, go into a separate bag and live in the car, or my luggage. Let’s take a look though.
Of course, clothing wise, I’ll always take the right clothing and footwear for the conditions I expect to encounter, but at the back left, is my waterproofs, which is basically Gore Tex trousers and a thin coat, in case it rains while I’m out, and I want to continue shooting. Note that I don’t carry waterproofing for my cameras. As you’ll have noticed, I use Pro 1 Series bodies, and L lenses, all of which are splash proof, so if it rains, I don’t have to mollycoddle my gear. I do often keep a hand towel with me, and will wipe of excess water from time to time, but basically, if it rains, my gear get’s wet.
Please note that not all L lenses are splash proof, so you’d need to check yourself before doing this, but as long as they are, you’ve got nothing to worry about with a bit of rain or snow. Condensation is a different matter. If I’m working in very cold conditions, I will ensure that all of my gear is dried and packed away in my bag before I go into a warm space. This might mean wiping things off in my car before going to a hotel, or before turning on the heating in the car if that’s where I’m sleeping, but usually just ensuring stuff if in a bag and zipped up is enough to stop condensation as long as the gear is dry. If I have things that can’t be put into a bag, I do carry large plastic bags just in case, but I rarely use them for this. I find myself using plastic bags more to lay on the ground if I want to get down low. If I’m just kneeling, I’ll use the knee pads attached to the Kiboko bag in the earlier photo, but if I end up lying down, I like to have a few large plastic bags with me. If I don’t have any bags, and the shot depends on me lying down though, I’ll go ahead and get dirty if necessary.
Moving along the back line of gear, next we have my X-Rite ColorChecker Passport, which you probably already know that I use religiously. Then we have my Walkstool, which is a collapsible stool which we looked at way back in Episode 84, but this basically can be used at the height you see here, for a low stool, or you can extend the legs to a height where it get’s you pretty much to a normal sitting height. It’s great if you end up in one spot for a long time, waiting for something to happen. You can just sit down and relax with this stool.
On the right on the back row is my Black Rapid Double Strap, which I have fitted with two Really Right Stuff Quick Release Clamps, so I can attach any lens or body to it quickly. I actually often take a third camera if I’m shooting Wildlife, the 5D Mark II, and I often have a camera on each side of the double strap, and a third camera on the 600mm on the tripod, which works really well.
In the middle at the left is my battery charger for the 1 Series camera batteries, two of which we can see in front of the charger, in the front left. Right in front of the two spare batteries is my Spudz lens cloth. I like to have a nice clean lens cloth in another bag for use at hotels or lodgings on extended trips, but the Spudz are get in the field, because you can just hang them off your clothing or camera strap, and get to them really quickly. some of them are also 18% grey, so can be used as a white balance grey card if necessary.
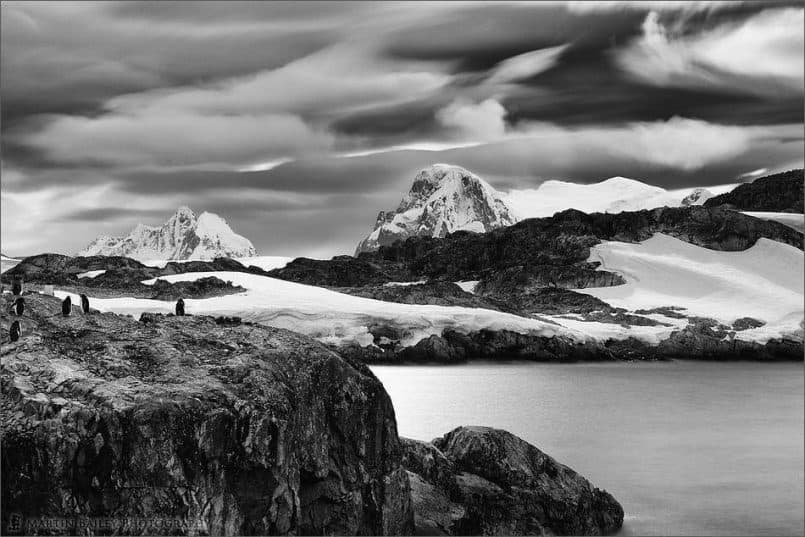
To the right of my batteries and charger is my filter case, with a couple of filters out to show you. I carry circular polarizers in the sizes necessary for my lenses and a variety of Neutral Density filters, including ND4, ND8 and ND X400, which is a 9 stop filter. I also carry the Singh Ray Vari-ND, but don’t use this as much as my fixed ND filters. I often stack these filters too to get multi-minute exposure during the day, like in one of my favorite images from Antarctica this year.
The Singh Ray Vari-ND is the square leather effect case to the right of the filter case by the way. Then just to the left in front of that is my yellow CF Card case. I use this case because it’s waterproof, and floats if dropped in water, as I’ve actually dropped my memory card case on the beach of a lake in the past, but these days, with my 64GB cards, I rarely find that I change cards in the field, but I still like to use this case, just in case.
I actually had to darken them down a bit in Lightroom so you could see them in this image, but in the middle of the front row, is two spirit levels that fit into the flash hot-shoe on the camera, to ensure that I get my camera straight. I really don’t like to see wonky horizons unless it’s on purpose, so I use these religiously to ensure I have things nice and straight.
In the center of the image are two Canon Remote Timers. Again, I like to have two of these so that I can use one with each camera. This is especially important for long exposures, because you can make use of the time while waiting for one camera to finish its exposure by setting up a second camera and running more than one at once.
To the right of the remote timers is a drop-in polarizer filter that slots inside the 300mm and 600mm lenses. The front of these lenses are too wide for a traditional circular polarizer, so you put them into the special slot towards the back of these telephoto lenses, and turn the filter using a tiny cog system. I don’t use this a lot, but when overall weight isn’t an issue, I like to take it along.
In front of that is an Angle Finder C, to allow me to look down into the camera if necessary, to shoot from ground level, or for shooting in space where I can’t get my head behind the camera, and LiveView isn’t an option either. The Angle Finder rotates 360º, so you can look from the side or whatever, so it’s not just for looking down into the camera, but it’s useful when you have to shoot in a tight space, as well as looking down.
The little bag to the top right of that is just a little bag of tiny tools, and the button batteries that go inside the camera bodies to save the date etc. I’ve had this battery die on me on a trip once in the past, and I had to keep resetting the date every time I turned the camera on. That was before it was possible to change the date in post, but still, I wouldn’t like to leave home for more than a day without this little bag of tricks. It also contains some lens cleaning fluid and papers, in case I get something nasty on my protector filters, or on the front element of lenses which I don’t have filters on.
I do use protector filters, as I’ve no evidence that they reduce image quality, and I rarely see any flare from them, but they do save me from directly cleaning the front element of my lens every time. I haven’t had any problems cleaning the front element of my 14mm, 300mm or 600mm, and in fact, the front element of the 300 and 600mm are just pieces of glass, just like protector filters, but I just like to reduce the risk of scratching my lenses as much as possible. The iron thing is that even pretty nasty scratches don’t really show up in the resulting images, but I like the peace of mind this give me.
To the right of my bag of tricks are my LED LENSER P7 flashlight, which I also talked about in Episode 198, and a new LED LENSER H7R head-light. The P7 is a small but very powerful flashlight, with a dimmer and very bright setting. This is great for lighting things up in the distance, and for light painting, but since I lost my old head light somewhere, I recently researched and picked up a second LED LENSER in the H7R. This is a focusable, head-light, and has a dimmer switch taking you from really dim, to unbelievably bright for the size, with a small slider that recognizes a hundred varying steps. It also recharges via a 5V USB connector too, so I can recharge from my computer, or a USB adapter in my car etc.
With my car being a Hybrid though, it actually has a 100 volt outlet in the back anyway, so I can recharge my laptop etc. in the field. I sometimes sleep in the car, to save on hotel bills and so that I can be at the location before dawn without having to get up really early and drive there etc. Here are a few items that I use when sleeping in the car to make it a bit more comfortable.
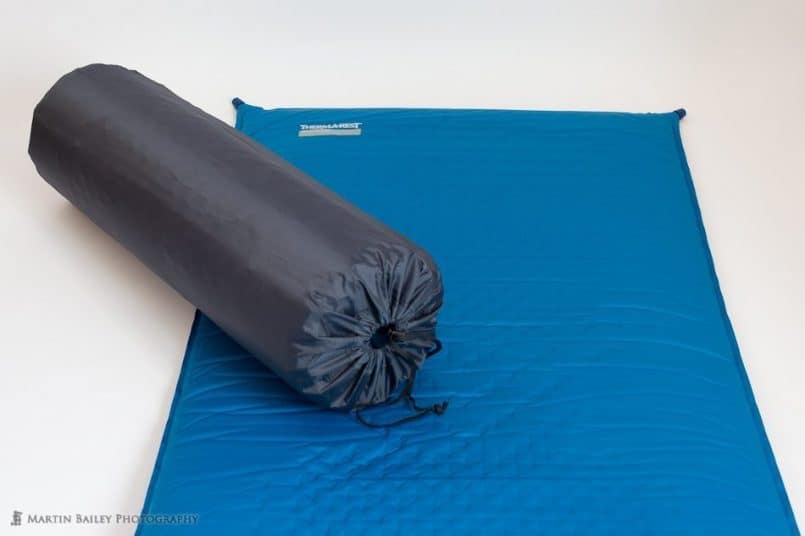
Firstly, we see here (above) a Therm-a-Rest mattress. Here I’m showing you the extent to which the mattress will self inflate, just by taking it out of the stuff sack and unrolling it. To make it a little more comfortable, you can blow into either of the valves that you can see at the top corners of the mattress. I think this particular model is now discontinued, but there are a lot of great mattresses in the range.
The front seats in my car recline so far that if you move the seat forward, they go full-flat, but there ares still a lot of bumps on the seats, so I bought these mattresses so that me and my wife could sleep in the car. When I’m out alone though, I’ve started to fold one side of the back seat down, and sleep in the back of the car, behind the driving seat, which turns out to be more comfortable, especially with the mattress.
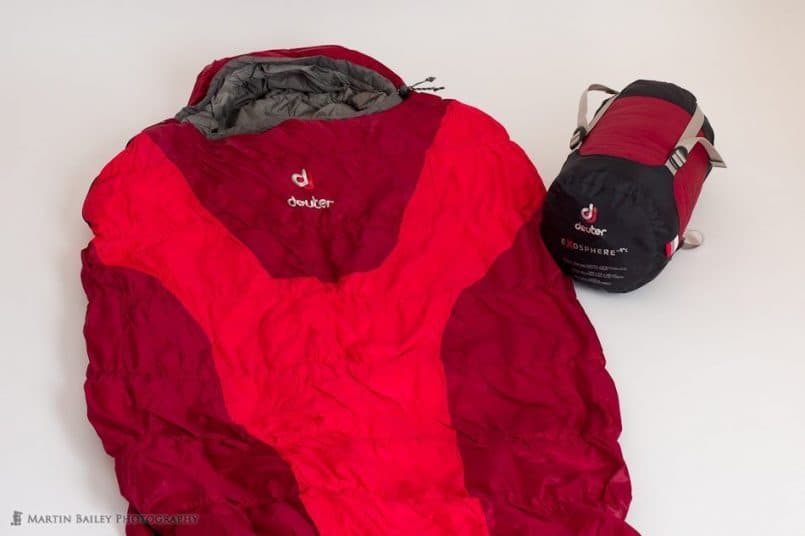
I don’t need this in the summer, often just using a fleece blanket, if I even need anything, but as the cold sets in, I use the deuter Exosphere Thermo Stretch Comfort Sleeping Bag. I have the -4ºC version, which is rated for comfort down to 2º Celsius and will be fine down to -4º, although it can be used lower. I don’t sleep in the car in like 20 below so I haven’t needed anything colder yet, especially as I’m in the car, and not actually camping.
One of the main reasons that I went for this sleeping back is because, as the name suggests, it is incredibly flexible. I don’t sleep well if I’m all wrapped up like a mummy, and this thing allows you to stick your legs and arms out to a degree, which makes a big difference to how well you sleep.
So, that’s about it for the gear I use when I’m out and about for Nature and Wildlife shooting. I do sometimes pack my Neos Adventure Overshoes and of course there are various items of clothing that I use to keep warm etc. that’s really focused on winter shooting, such as my Baffin boots, and down pants, but we won’t go into that today.
Note that if you want to see images shot with any of my lenses, if you go to my About page on the blog, all of my lenses are linked to images shot with those lenses in my gallery. I know that gear episodes aren’t for everyone, but hopefully you’ve enjoyed looking through the gear I use for Nature and Wildlife shoots. Note too that I won’t include all of the links in the show notes, but many of the things I’ve mentioned are links in the blog post, and if you are looking for something that you can’t find, just leave a comment on the blog, and I’ll search it out for you.
Before we finish I’d like to also wish you all a wonderful New Year, as we say goodbye to the somewhat turbulent 2011, and welcome in 2012. I hope that 2012 brings you success, well-being and happiness.
Show Notes
We’ve removed the gear links as they are no longer valid.
Music by UniqueTracks
Audio
Subscribe in iTunes for Enhanced Podcasts delivered automatically to your computer.
Download this Podcast in MP3 format (Audio Only).
Download this Podcast in Enhanced Podcast M4A format. This requires Apple iTunes or Quicktime to view/listen.



0 Comments