Welcome to episode 24 of the Martin Bailey Photography Podcast. Last week I talked about using telephoto lenses. Telephoto lenses can be a challenge to use well due to the additional camera shake brought about from the magnification of the lens. Today I’m going to talk about Extenders as Canon terms them, or Tele-converters as most other camera manufacturers term them, and also about Extension Tubes, which are similar to tele-converters, but behave differently and have different applications, so we really should get into that here too.
If you didn’t listen to episode 23 yet, we basically learned that the longer the lens, the more prone to camera shake your images will be, and I mentioned a few ways we can minimize the risk of this, including the rule of thumb I use, which is using the focal length you are shooting at as the slowest advisable shutter speed. If you are not so confident with this, it might be a good idea to go back to episode 23 first. If you are OK with this I would not say it is essential to listen to these Podcasts sequentially.
Also, before we move on to today’s main topic, I’d like to give you a tip I received by mail this week from Don McKay of McKay Photography out of Portland, Oregon in the US, which is a great way to practice keeping your camera still while hand holding. Don says “one of the biggest problems is when you push the shutter button. Most people push the shutter button too hard and move the camera making a blurry picture. The technique is to temporarily tape a mirror on the lens cap, and set a strong light such as a flashlight in front you, so that you get a reflection of the flashlight on the wall in front of you. Try pressing the shutter button and watch the reflection on the wall. If it moves then you are moving your camera. Practice pressing the shutter button until the reflection no longer moves.” Thanks Don for this jewel of advice. I’m sure many listeners will have fun trying and will hopefully benefit by being able to release their camera’s shutter without introducing as much camera shake as before.
So to get to the main topic for today, first let’s talk about extenders or tele-converters. There are various reasons why you might consider investing in a tele-converter. They are a relatively cheap way to increase the focal length of your existing lenses. This obviously is going to save you money, as you don’t need to buy the longer focal length lens. Also, it saves you carrying around the additional weight of multiple lenses. Sometimes you simply want to get even closer to your subject, even with an expensive super-telephoto lens.
Tele-converters fit between the lens and the camera body, and actually contain additional lens elements to maintain as much image quality as possible without changing the lenses minimum and maximum focusing distances as Extension tubes do, but we’ll get to that shortly.
First let’s take a look at shot number 697 on my Web site. Remember you can see the photos in iTunes or this first one on your iPod, but you can also go to my Web site at martinbaileyphotography.com and enter this number into the field on the top page or the Podcast page and click the orange button to jump to the image in my online gallery. You can also navigate to this episode in the list and just click the thumbnail you’ll find there.
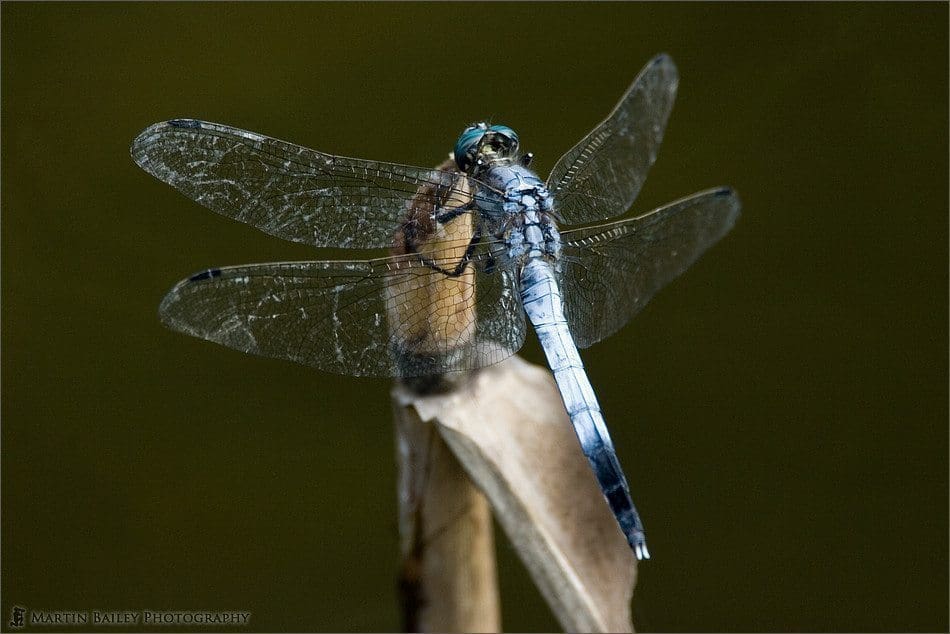
In photo number 697 you can see that I have used my EF 100-400mm F4.5-5.6L IS USM lens with the EF 1.4X Canon Extender. I used this lens with the Extender to shoot this dragonfly perched on a broken reed stalk in a park near my home here in Tokyo. I used the Extender as I wanted to fill the frame with the subject, as the background would not have added much to the shot, being just the murky pond water, and also I wanted to allow the viewer to see as much detail in the insect as possible. When you think of shooting insects, you might think of a macro lens, but at this distance a 100mm or even a 180mm macro lens would not allow you to fill the screen with the subject, so the only remaining option to avoid cropping a tiny portion from a shot made with a shorter focal length, is to get out the long lens and put on an extender to make your image.
When you put on an extender or tele-converter, it multiplies the focal length by the number in the name of the extender. In this case 1.4, but if you used a 2 times extender, the focal length would be doubled. I shot the last image at 400mm with the 1.4 extender, so that gives me a focal length of 560mm. Remember too, that like me in this shot, if you use an extender with a Digital SLR, you might also need to calculate in the crop factor to get the effective focal length. I was using a Canon EOS 20D here, which has a crop fact of 1.6, so the effective focal length was approximately 900mm.
The other thing that will happen when you use an extender is you will loose one stop of light for a 1.4 times extender or two stops of light for a 2 times extender. This means that if you use a 1.4 extender with an F5.6 lens, you will have a maximum aperture of F8. If you use a 2 times extender with an F5.6 lens, you will have a maximum aperture of F11. Which means basically if you are in Aperture Priority mode, your shutter speed will be twice as slow, or doubled with a 1.4 extender and four times as slow, or quadrupled with a 2 times extender. Let’s use the dragonfly shutter speeds as an example. The aperture used here was F8. This lenses maximum aperture at 400mm is F5.6 and I had the lens wide open. The 1.4 extender forced the aperture down to F8, which is what I shot at. The shutter speed was 1/160 of a second. I was actually shooting in manual exposure mode here, but had been using Aperture Priority, without the 1.4 extender, the camera would have set a shutter speed of 1/320 of a second, which is half the shutter speed. This is because I have lost one stop of light due to the 1.4 times extender. It is due to this loss of light, and the fact that it was not all that bright a location, that I selected an ISO of 400. Also note here that I was using a tripod, not hand holding.
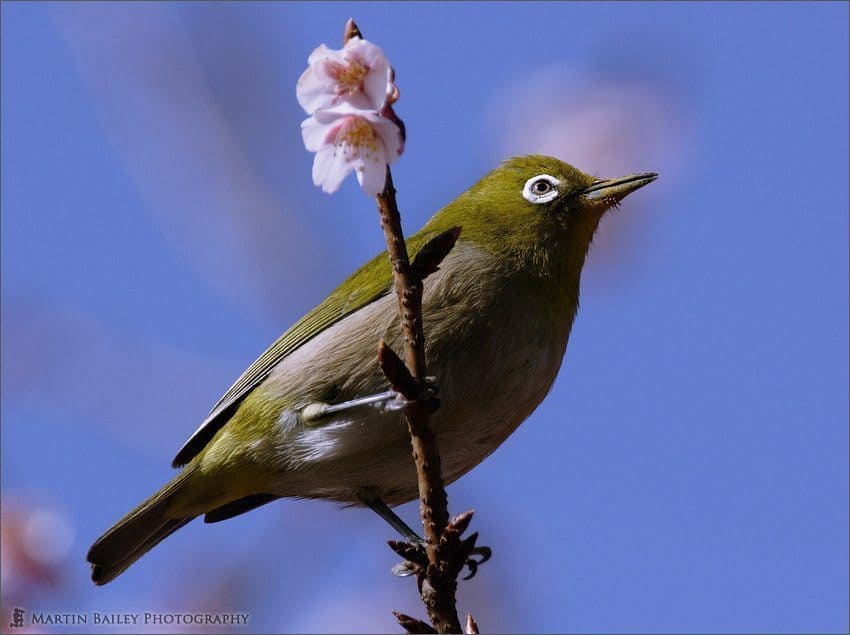
Let’s take a look at one more example of an image shot again with the 100-400mm lens, but this time with a 2 times extender. Take a look at shot number 575 of a Japanese White Eye bird. This is actually not a great example of the multiplication of the focal length, as I was actually using a focal length shorter than the last example shot, because I shot this before I bought the 1.4 times extender. It was shot at 520mm, which was actually 260mm with the 2 times extender. This was also shot with the 20D, so the effective focal length with the crop factor is 830mm. A quick reminder, but if you look below the shots in the gallery you can see all the camera settings, and you can see that for this shot the aperture is set to F11. This time too the lenses aperture was set at F5.6, but the 2 times extender forced an aperture of F11, which is two stop smaller than F5.6.
We can also calculate what the shutter speed would have been had I shot this at F5.6. We can do this by first halving the final shutter speed of 1/640 of the second to get 1/1250, which is one stop, the same as we’d lose with a 1.4 times extender, and then halving if it again we get 1/2500 of a second, which is two stops, which is the amount of light you lose with the 2 times extender. Again here I was using ISO 400. In this example note too that I was hand-holding, so I needed a shutter speed fast enough to eliminate camera shake. Even with the Image Stabilizer turned on, at 1/640 of a second, some of the shots of this White Eye were blurred and unusable, emphasizing the advice to shoot in bursts when using telephoto lenses, especially when your shutter speed is less than the effective focal length you are shooting at.
One other very important thing to bear in mind is you loose auto-focus with some combinations of camera and lens with the 1.4 and 2 times extenders. I’ve not looked into this for Nikon cameras, but the Canon extenders, you basically need a widest aperture of F5.6 for auto-focus to work. This means that the 1.4 times extender will give you auto-focus, with the center focus point only in most cases, if you use it with a lens with a maximum aperture of F4 or wider. The 2 times extender will work similarly if you use it with a lens of F2.8 or wider aperture lens. This is because F4 becomes F5.6 with the one stop the 1.4 extender costs you, and F2.8 also become F5.6 with the two stops the 2 times extender costs you.
Note too that there are certain combinations of Extenders and lenses that work, and some incompatible combinations. The same goes for extension tubes. So to find out if your expected combinations are compatible, and to see what auto-focus limitations you’ll have, you really need to check your lens’s instructions manual before deciding on what to buy.
One other thing to bear in mind, so it really goes without saying is depth-of-field becomes much shallower as the focal length of your lens increases, of course, depending on how far away your subject is. I talked about this in episode 23 too. I just wanted to note though that there is nothing difficult to calculating depth-of-field when using teleconverters as it follows the normal rules that apply for that focal length. That is, 300mm lens with a 2 times extender and an aperture of F8 has exactly the same depth-of-field as a 600mm lens with the aperture set to F8.
One last thing on extenders before we move on; with regards to actually buying an extender, there was a discussion started in my forum this week in which Wayne Grant from Connecticut, USA mentioned that he’d purchase the 1.4x without question. Wayne considers it a ‘must have’ for telephoto prime lens work (or with the 70-200/2.8 and other fast zooms). But the 2.0x is more optional – a later addition to your kit. I couldn’t agree with Wayne more, although I actually bought the 2.0x first. This is a flaw in my thinking though. Basically the cost of the 1.4 and the 2.0 times, here in Japan at least, is exactly the same, and I followed my Mum’s advice from when I was a kid, which is, “If you gonna have one, have a big-un”. I went for the larger one first, but soon realized that it was too much for most occasions.
So, moving on to the other topic I wanted to briefly cover, and that is Extension Tubes. Whereas we use extenders or tele-converters to increase the focal length of the lens without affecting the minimum and maximum focusing distances, extensions tubes enable you to shorten the minimum focusing distance so that you can focus on subjects much closer to the lens. It is important to note that the maximum focusing distance is greatly reduced also, often to the point where the lens cannot realistically be used for anything other than very close work while the extension tube is attached. The degree to which the focusing distances are reduced depends on the lens you are using it with. Again you’ll need to look at your lens manual to see the focusing distances with the available extension tubes attached.
Sometimes you’ll find that the lens is not compatible, as with Extenders or Tele-converters. Sometimes a zoom lens can only be used only in the telephoto range, and not compatible in the wide angle range. Most of the time as far as I know, you retain auto-focus with extension tubes too, which is handy, but I find that for most very close work, switching to manual focus is better anyway.
Canon does two extension tubes, the EF 12 II and the EF25 II. The number in the name indicates the length of the tube in millimeters. Nikon I believe also does an 8, 14 and 27.5mm extension tube. There are also a very competitively priced set of 3 extension tubes from Kenko that includes 12, 20 and 36mm tubes.
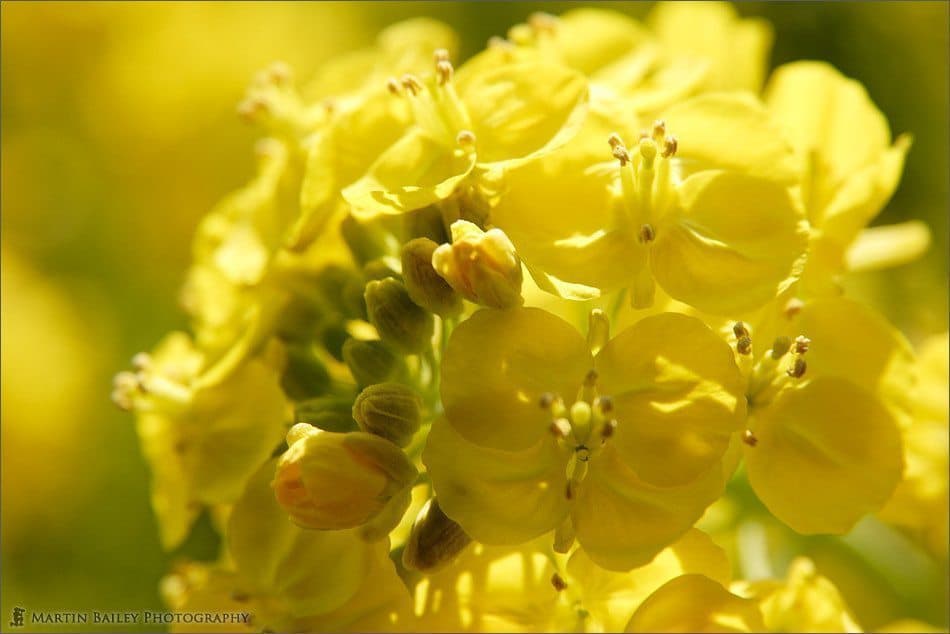
I only own the EF 12 II, and one shot with this fitted between my EOS 20D and the Canon EF-S 17-85mm F4-5.6 IS USM lens is number 601 on my Web site. Actually, with this combination of lens and body, the focusing range is incredibly shallow and very close to the front element of the lens. I recall that I actually ended up getting pollen on my protector filter while shooting this. It was shot at F5.6 for 1/200 of a second and the ISO set to 100. You can also use extension tubes with Macro lenses to enable you to get incredibly close to the subject should you want to. This is something that I want to experiment with more in Spring this year, so I might well have an update for you at that time.
Beep/Click
So that’s about it for this week. Once again I hope that this has been of some help. Remember that you can contact me with feedback or requests via the Contact Form on the Podcasts page at martinbaileyphotography.com or with private messaging via the forum if you are a member. With forum members now up to almost 200, it is becoming quite a lively place to discuss photography related issues at all levels, so if you’re interested, come along and register and join in. Of course registration is free and just takes a moment. I’m always interested to hear your views and we have a great crowd in the forum too, so I look forward to hearing from you.
Have a great week, and happy shooting! Bye-bye.
Show Notes
The Music in the first 28 Podcasts is copyright of William Cushman © 2005, used with kind permission.
Subscribe in iTunes for Enhanced Podcasts delivered automatically to your computer.
Download this Podcast in MP3 format (Audio Only).

0 Comments