In the age of digital with the histogram at our fingertips, the light meter is in many situations no longer as necessary as it was years ago, but there are a number of reasons why I continue to use one. I recently added another reason, by creating a camera profile for my Sekonic L-758D light meter which increases its usefulness even further, so today I’m going to walk you through that process and why I find having a camera specific profile in my light meter useful.
Before I go into details of the process for creating the profile, I’ll explain what this enables me to do, so that you don’t continue to wonder what this is all about. First of all, I’m using a Sekonic L-758D Digital Master Light Meter. In the States this is the L-758DR, which I believe has some extra Pocket Wizard features, but they are basically the same meter otherwise.
Why Am I Excited About Camera Profiles?
Take a look at this photo (below) and if necessary click on it to view as large as possible, and check out that scale between the bottom line of numbers from -7 to +7 and the five carets that indicate meter readings. There is a line of 23 upward pointing triangles, and then one more to the right, and a second a little further away on the far left. This line of dots represents the dynamic range of my camera, and is there because of the profiling process that I carried out a few weeks ago, and that I’m going to walk you through today.
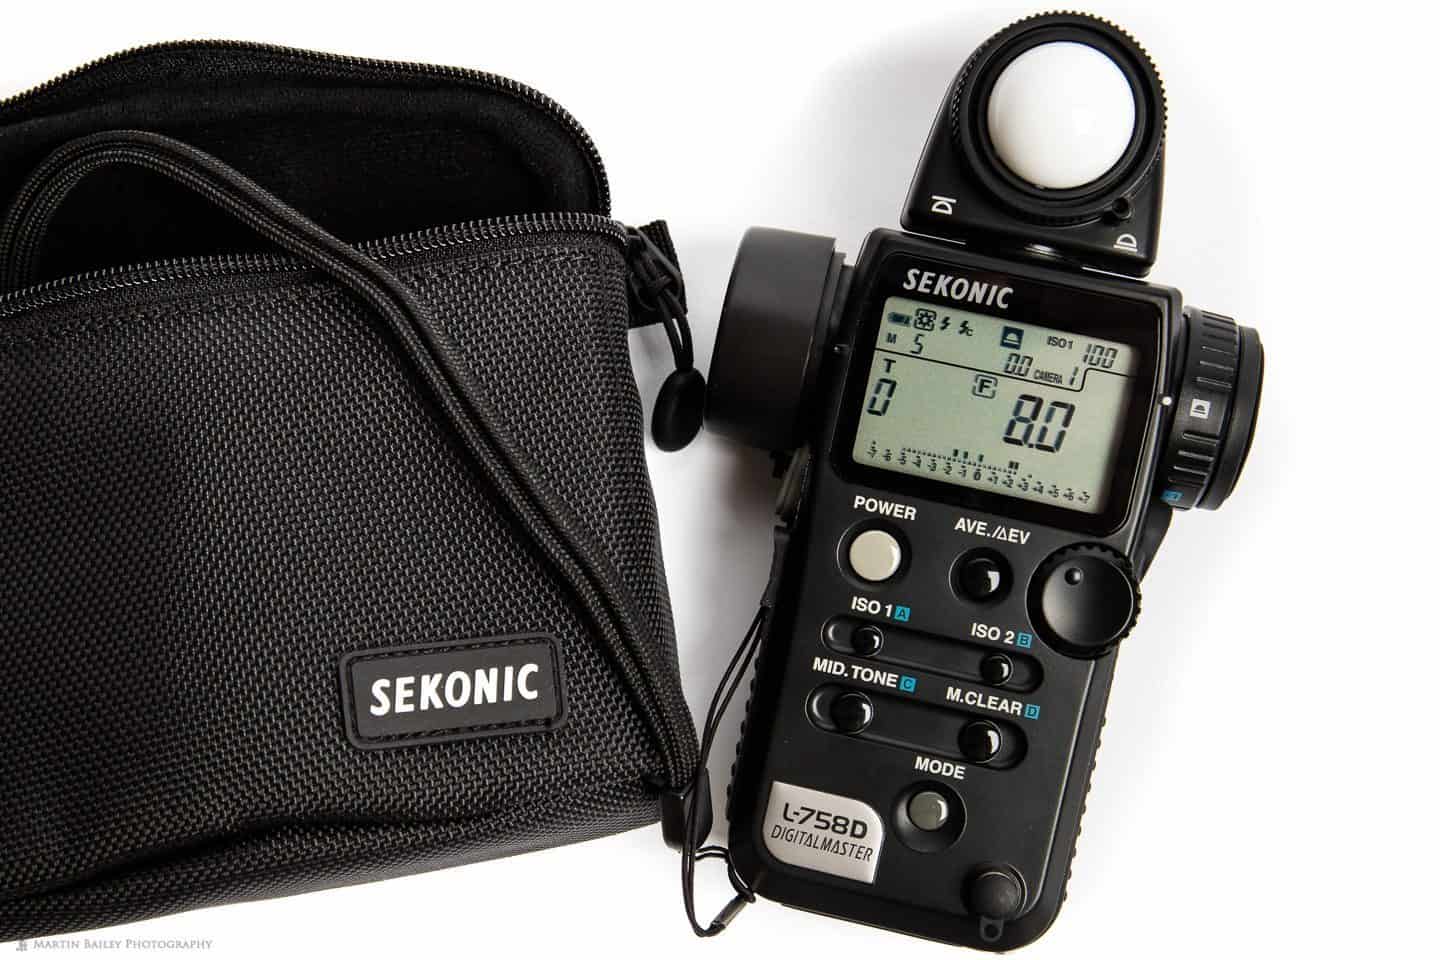
Sekonic L-758D Digital Master Light Meter
How cool is that though, right!? I can actually see the dynamic range of my camera right there on the meter! What this means is that in the field I can take meter readings of the scene, and decide how to approach the exposure based on how high I take my highlights, and often more importantly, how dark I am prepared to let my shadow areas fall.
Light Meter as a Learning Tool
Now, yes, of course I can also do this with the histogram, but being able to measure and analyze this data as I shoot is an incredibly valuable tool for understanding exposure, especially when you start to take a look at images and map the tones in your images to understand why certain situations are possible, and when others simply wouldn’t work.
Also, quite often in my case, and maybe yours too, being able to look at the various exposure readings from a scene is an invaluable tool in the teaching environment. I walk people through exposure during workshops, and although this often works for Canon users, explaining exposure with a camera is not as useful as being able to actually show the readings right there on the meter. The meter is much more objective, and kind of removes the ambiguity that a camera can often introduce if the student isn’t familiar with my camera system.
I do use a meter practically in various situations too, both in the field and when I’m setting up studio lights, and the Sekonic L-758D (or L-758DR in the States) has some incredibly powerful features for measuring and comparing studio lights and ambient light conditions etc. but we aren’t going to get into that today. I’ve been using a meter for more than 15 years now though, and have always found them to be a very valuable tool to help me learn and teach exposure, so I’m looking forward to sharing this new development with you today.
Creating a Profile for the Sekonic L-758D Light Meter
I’ve had this Sekonic L-758D meter a while now, but have only just created a profile for it, to utilize it’s full power. To create the profile, you need a Sekonic Exposure Profile Target II. You can use a number of different targets, including some of the X-Rite color targets, but I bought the Sekonic Exposure Profile Target II, which is also made by X-Rite, but specifically for the Sekonic to create the profiles we’ll look at today.
You can create multiple profiles, including one’s specifically for flash and studio lighting, but today we’ll walk through creating a profile with ambient light.
Wait for an Overcast Day
To shoot the test target for an Expansion mode profile, which I found to be the best method, it’s best to wait for a heavily and evenly overcast day. You need the cloud cover to be pretty even so that the light doesn’t change during your exposures, but you also need it to be really heavy overcast, because you have to shoot five bracketed images to create the Expansion mode profile, and the two extremes of these images are plus and minus 8 stops.
That means if your base exposure is lower than 1/8 of a second, 8 stops below will be longer than 30 seconds, which is fine, but requires using Bulb mode etc. and a timer. If you use a shutter speed faster than 1/30 of a second, your 8 stop above exposure is more than 1/8000 of a second, and that’s the fastest shutter speed available on most cameras, so you can’t start with a shutter speed faster than 1/30 of a second.
Meter Ambient Light
You have to set up the target so that it’s level with the camera, and has even light falling on it. I used a light stand and a pair of plant clamps to hold the target in place, as you can see in this photo (below). Once you have your camera and target in place, meter the light, first with the Incident meter, which is the white dome that you see here, and either take a photo like this, or note the ISO, shutter speed and aperture settings, down to that 10th of a stop that you see as zero in this image. You need to add this fraction into the software, so this is important.
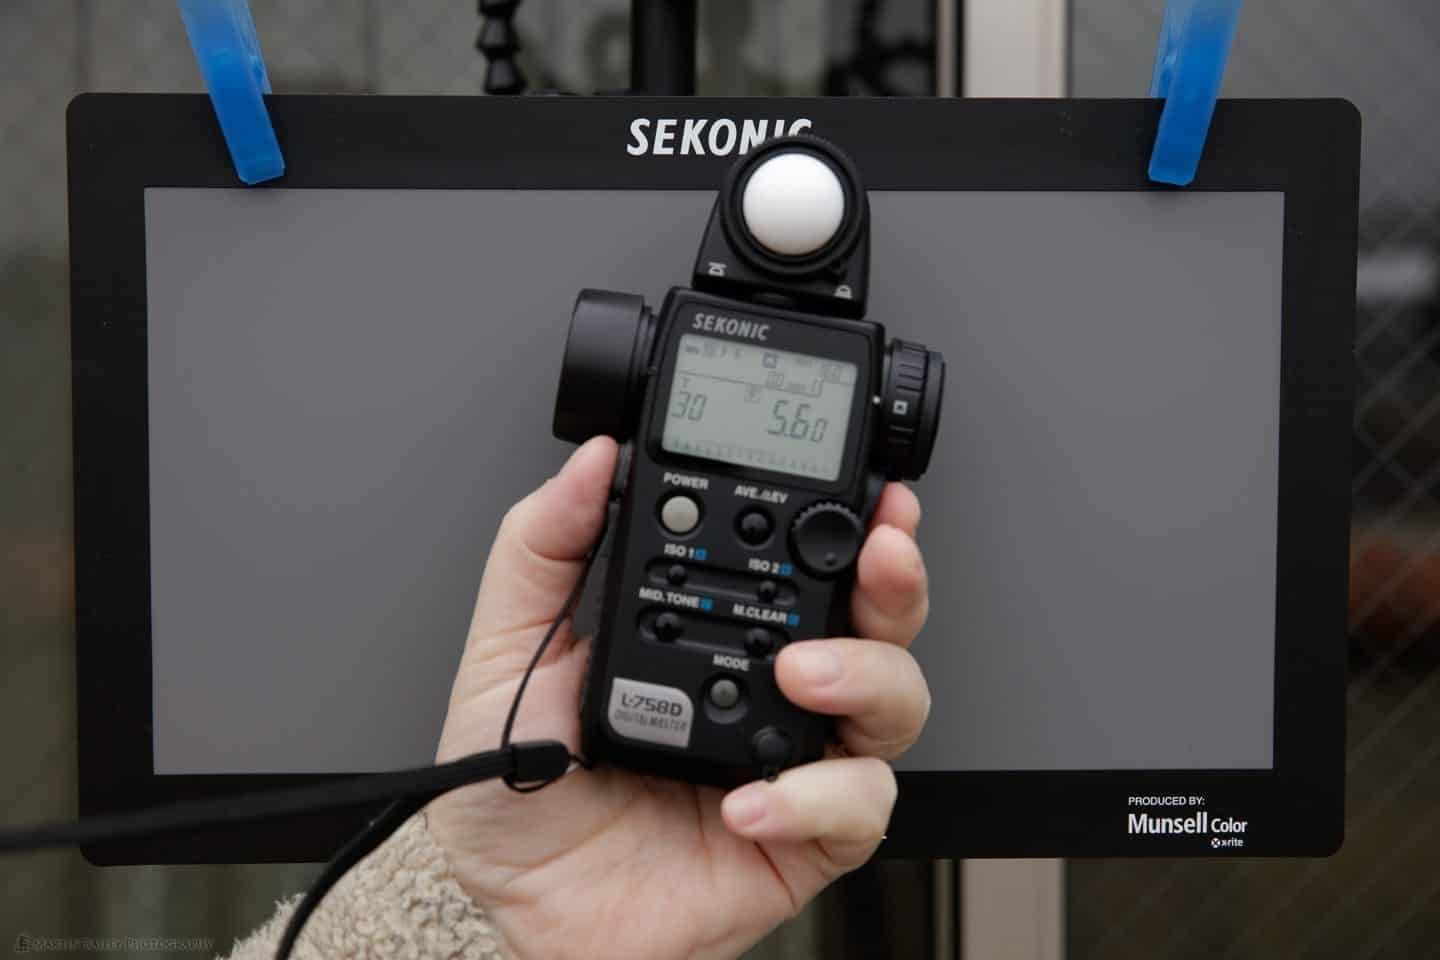
Sekonic L-758D Creating Profile – Metering the Light – Incident
Then you switch to the Reflected Spot metering mode, by rotating the band around the eyepiece on the the right side of the meter, and point the spot meter at the gray card, while looking through the spot meter viewfinder, and take another meter reading. Again, you need to note these settings or take a photo of them, like this (below). My light was at f/5.6 for a 30th of a second at ISO 160, so it was the same with both the Incident reading and Reflected Spot metering modes. I adjusted the ISO to 160 because the aperture and shutter speeds can only be selected in full stops in the software.
Sekonic L-758D Creating Profile – Metering the Light – Reflected
Once you have the meter readings, with your camera in Manual mode, set the same values on your camera, and note where the exposure indicator is falling with the camera in Spot Metering mode. My camera was reading exactly the same exposure, with the caret on my meter at zero, which means there is no need to calibrate the meter to match my camera. If there was a discrepancy here, I could change my meter in 1/10 of a stop increments to ensure that they are both on the same page, but this was not necessary.
Set a Custom White Balance
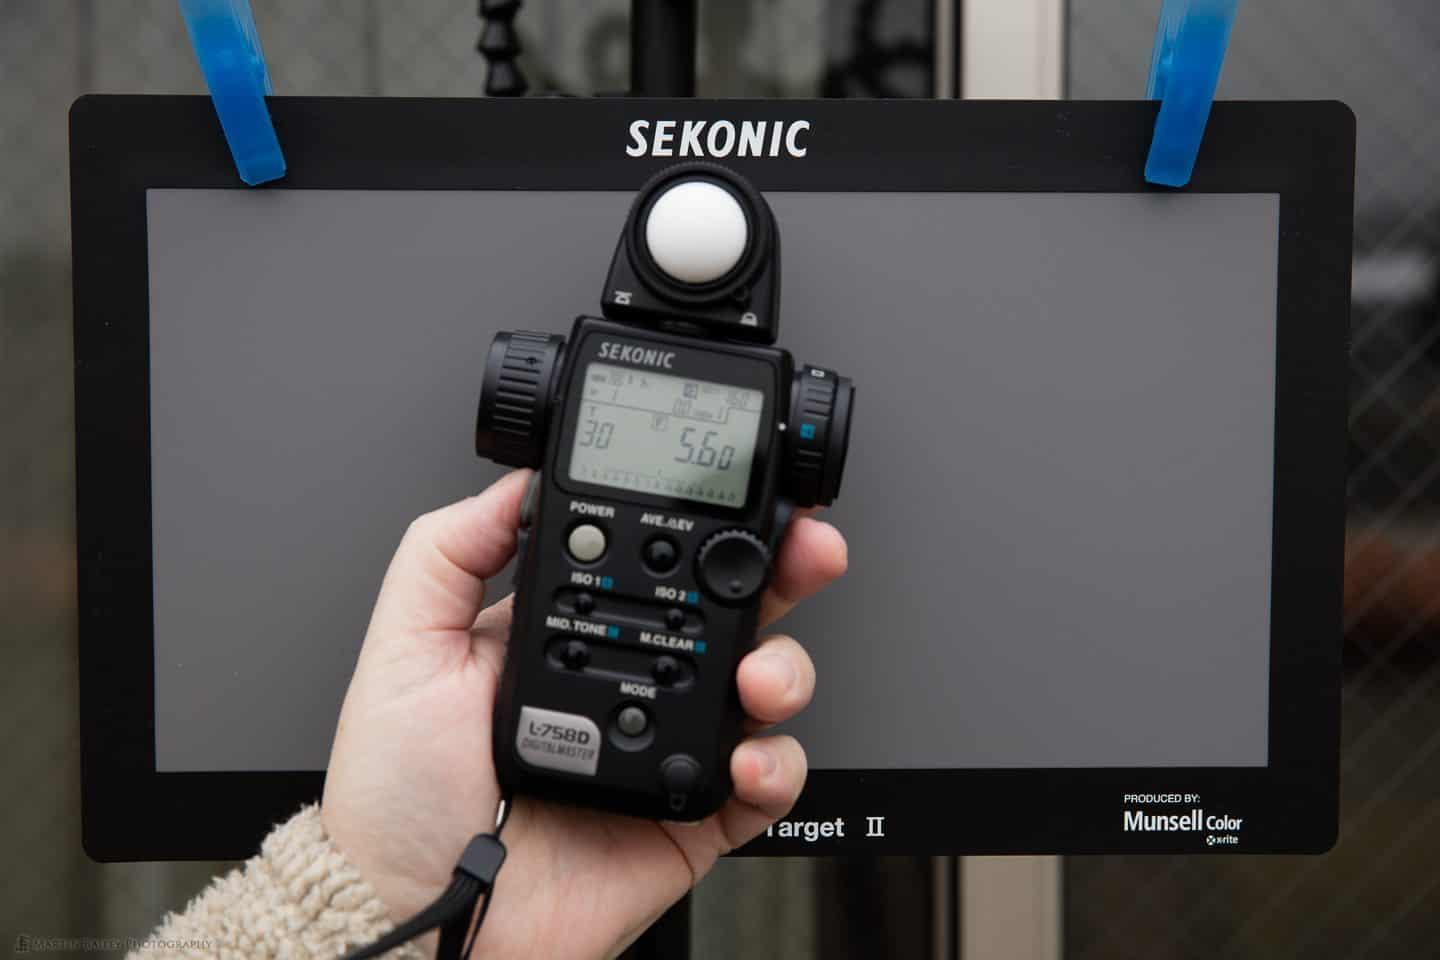
We then take a photograph of the gray card side of the Exposure Profile Target II (below) with the metered exposure settings and use that photograph to set a custom white balance in the camera.

Sekonic Exposure Profile Target II Gray Card
After you have your custom white balance set, turn the Exposure Profile Target II around, so that you can see the gray patch side, and check your exposure using the light meter in EV metering mode. You need to turn this on in the custom settings beforehand. Details of how to do this are in the manual.
Ensure Even Light is Falling on the Target
Then, take an Incident light reading with the meter in all four corners of the Target in EV mode. The light falling on the card cannot be any greater than 0.1 EV different across the face of the card. I have a wall behind me on my studio balcony, so I get 10.0 EV on the top of the card, and 9.9 EV at the bottom of the card, but that’s within the acceptable range, so I’ll go with this.
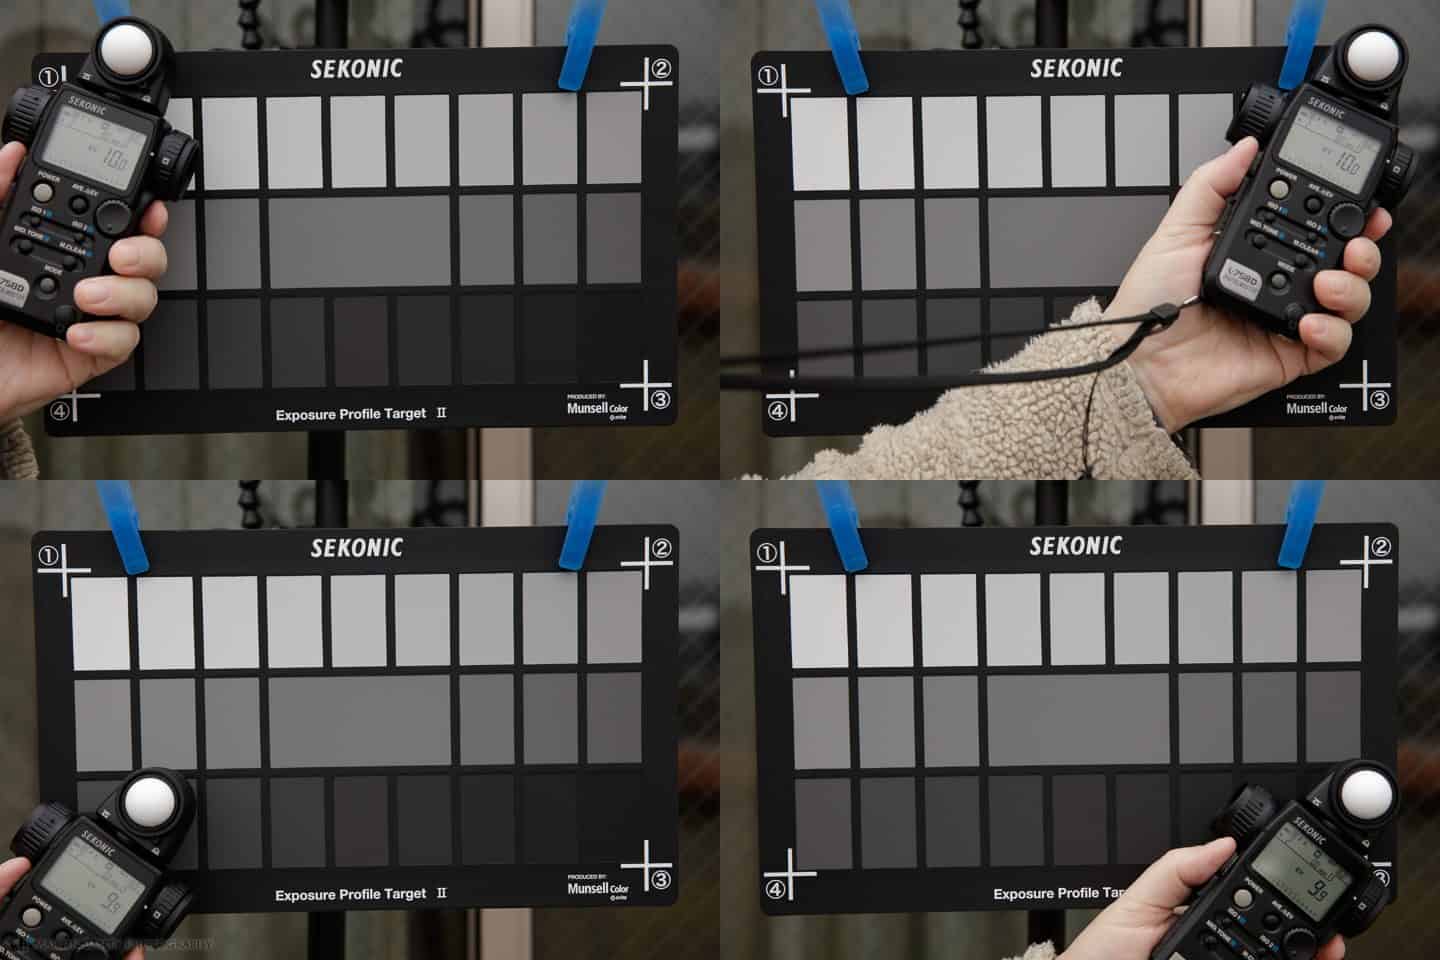
EV Meter Reading of Four Corners of Exposure Profile Target II
I found that the Sekonic Data Transfer Software that you use to create the profiles and transfer them to the meter could not handle the full sized 50 megapixel 5Ds R images. I received an error while creating the profile. Also, because you have to feed the software JPEGs and because I didn’t want Lightroom or Photoshop messing with the images, I set my camera to save small high quality JPEGs as well as raw images before I started these test shots, just for the purpose of creating this profile. I left it creating raw as well simply in case I forgot to turn this off again. It would not be good to get back from my next shoot to find that I shot it all in small JPEGs.
I also ensured that the Picture Style on my 5Ds R was set to Neutral before shooting my profile images. I don’t want the camera messing around with the images as it creates my JPEGs from the raw files, so Neutral is a good setting for that.
Shoot Your Profile Images
Once you are ready, and before the light changes, you can now shoot the five images to create an Expanded mode profile. Start with your base settings dialled in with the camera in Manual mode. These are the valued that we read with the meter earlier. My settings were a 30th of a second at f/5.6, ISO 160.
Shoot the first image, and then adjust your shutter speed time making it 4 stops longer. If you have your camera set up to adjust the exposure settings in 1/3 stops, you can just count out 12 clicks, which adjusted my shutter speed from 1/30 of a second to 0.5 seconds, and then shoot your second profile image. Then change the shutter speed a further four stops, which took me to 8 seconds, and shoot a third profile image. Then repeat this for a 4 stop faster shutter speed, which from my base exposure setting gave me 1/500 of a second, for my fourth profile image, and a fifth and final image with a 1/8000 of a second shutter speed.

Five Sekonic L-758D Light Meter Profile Shots
As you can see in this image with all five photos merged into one (above) the under and over exposed shots are pretty much useless exposure-wise, but this information is what the software needs to find out just how much dynamic range your camera has, as it creates the profile.
You might also think that with the +/- 8 stop images being so far under and over exposed that we don’t need to do a five image profile, but I tried the three image profile, and it didn’t include the entire dynamic range of the 5Ds R, so I definitely recommend using the five image method if you pick up the newer Exposure Profile Target II.
Sekonic AutoUpdateUtility for El Capitan Support
Note that you can get the latest software from Sekonic’s web site, but at the time that I created this episode/blog post, they do not officially support Mac OS X El Capitan (10.11). I was not able to connect to my meter via USB with the latest version of the software.
However, I found that by running the AutoUpdateUtility in the Sekonic folder that is created when you install the DTS software, the auto-update downloaded what I suppose is an even newer version of the software, which did enable me to connect to the meter and transfer the profile I created. Hopefully this won’t be a problem for long, but if you cannot connect to the meter, try running the AutoUpdateUtility. It might work for you too.
I don’t know if there are similar issues with Windows, but the Web site only states support for up to Windows 8 as of Dec 2015, so Windows may be a little behind as well. When I called the Japan Support team at Sekonic didn’t seem overly enthusiastic about updating the software for the latest OS versions, for this meter at least. They said that they were updating the software for their newer meter with higher priority, although their newer meters are not as good as the L-758D, so I’m hoping that Sekonic changes this stance.
Creating Your Camera Profile
Now that we have the software installed and our five profile photos, it’s time to create the camera profile and transfer it to our light meter. Locate the JPEG images that you shot on your hard drive, and make a copy of these in a new folder on your desktop or somewhere that you can easily navigate to, then start the Sekonic Data Transfer Software. Select the option to Create New Profile in the first dialog, and then select Advanced Mode.
You can pretty much ignore that it says “+/- 10 steps” about Advanced Mode in terms of the images required if you are using the Exposure Profile Target II. After clicking Advanced Mode you’ll see the following dialog (below). Select the Extended mode radio button on the left and select the Exposure Profile Target II if that’s what you have, and click Next.
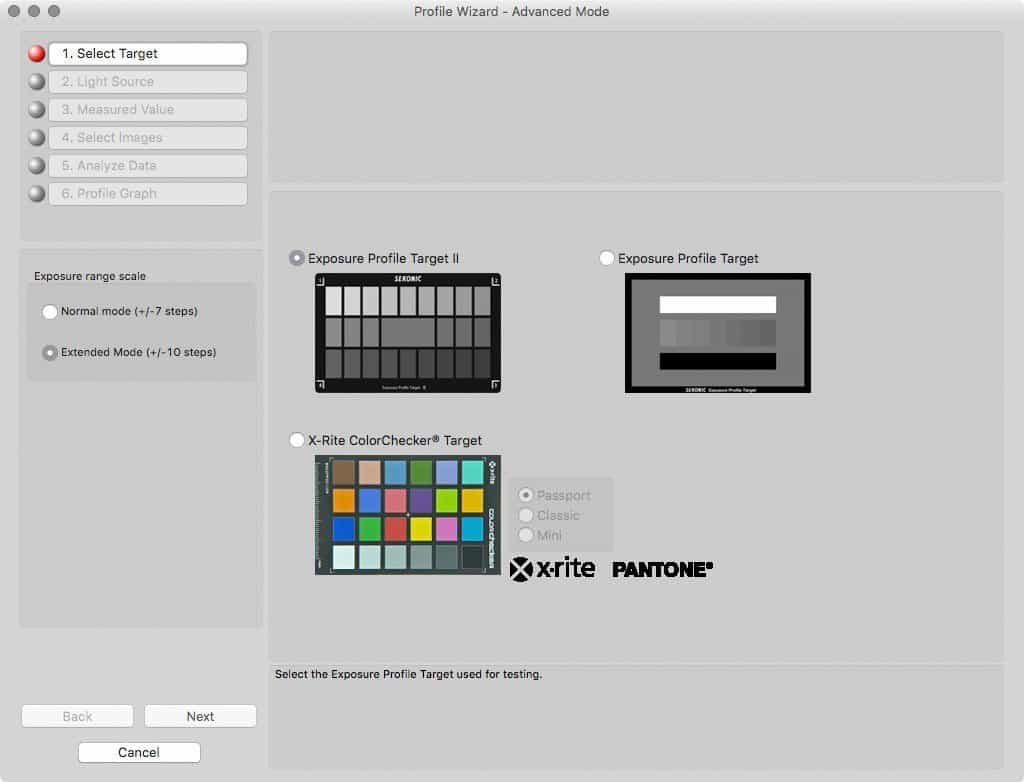
Sekonic DTS Select Target Dialog
On the following screen select Ambient if you are also creating an ambient light profile, and click Next again. The process is very similar if you are creating a profile for Flash. You’ll just need to check the manual for the extra steps involved in setting up to shoot your profile images etc.
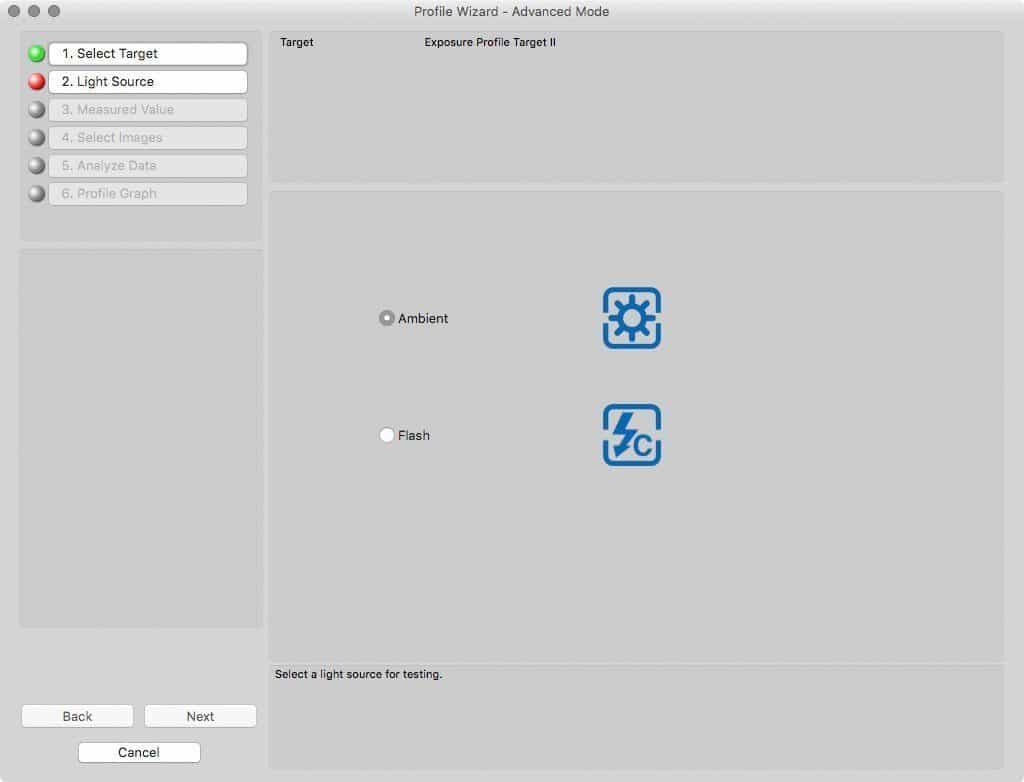
Sekonic DTS Select Light Source
In the following screen, select the exposure settings that you either noted down or took a photo of earlier in the process (below). For me, this was ISO 160, Shutter Speed 30, Aperture 5.6 and zero for the 1/10 pulldown. My readings were the same for both Incident and Reflected metering, so I added this to both sets of pull downs, and click Next.
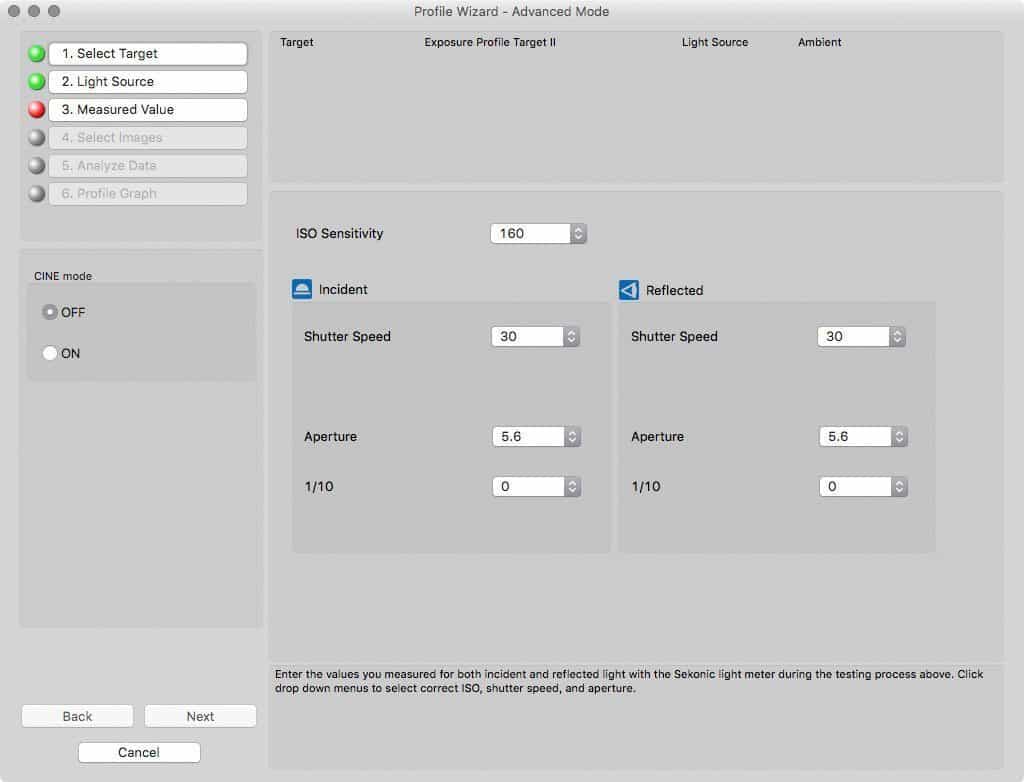
Sekonic DTS Enter Exposure Settings
On the following screen you’ll be asked to point the software to the folder into which you saved your profile photo JPEGs. Once you show it that folder, you’ll see the following dialog (below). As long as you ensure that your image EXIF Data is not stripped from the images, the software will automatically detect the exposure settings, so you can ignore the Light output Correction Value (EV) field. Just ensure that the green checkbox is on for each image, and click Next.
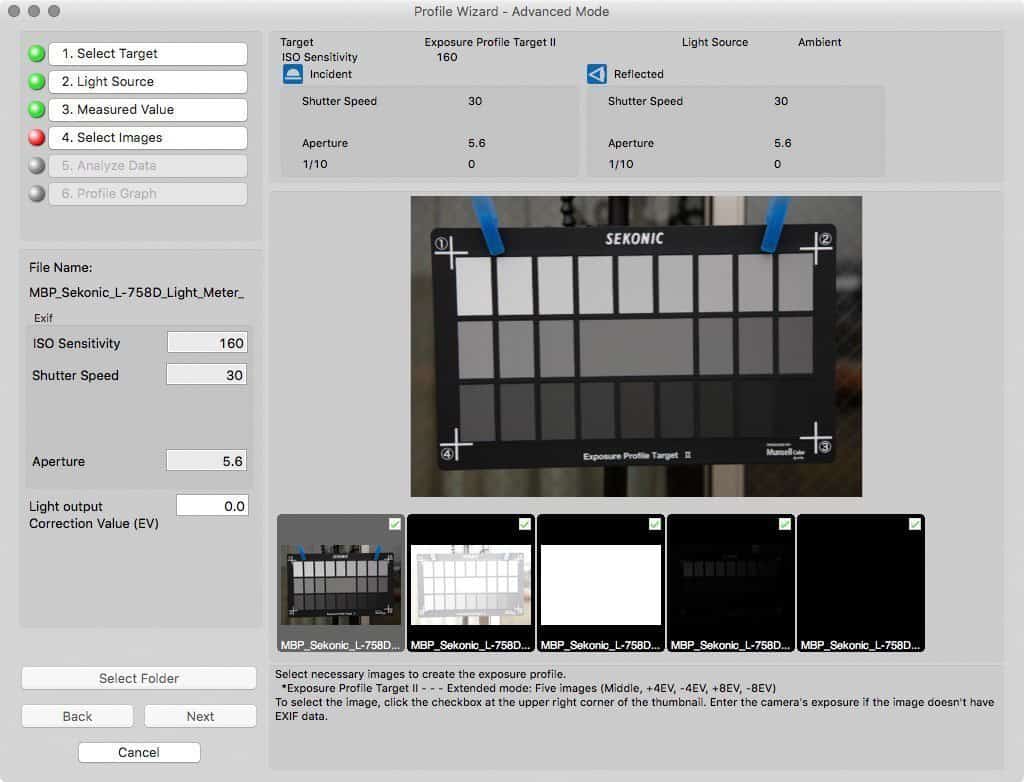
Sekonic DTS Select Images Dialog
In the Analyze Data screen, click each image and ensure that the software finds the registration crosses in each image, or adjust the green + marks as necessary, and ensure that the large green checks are all on, then click Next again.
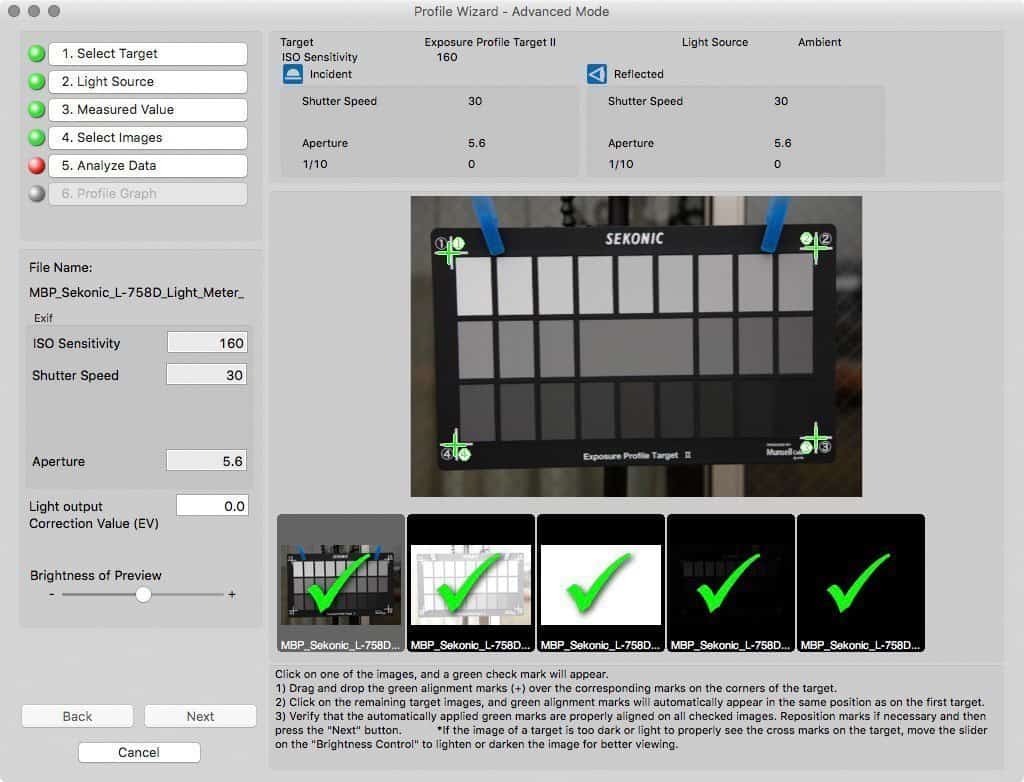
Sekonic DTS Analyze Data Screen
After analyzing the information in your five profile images, you’ll be presented with a graph similar to this (below). The two green vertical lines represent Sekonic’s idea of where we should place our clipping points, which is where the information in our scene would start clipping, or in other words be under and over exposed. The red vertical lines are to represent the dynamic range of our camera’s sensor. Both of these values are initially way too conservative.
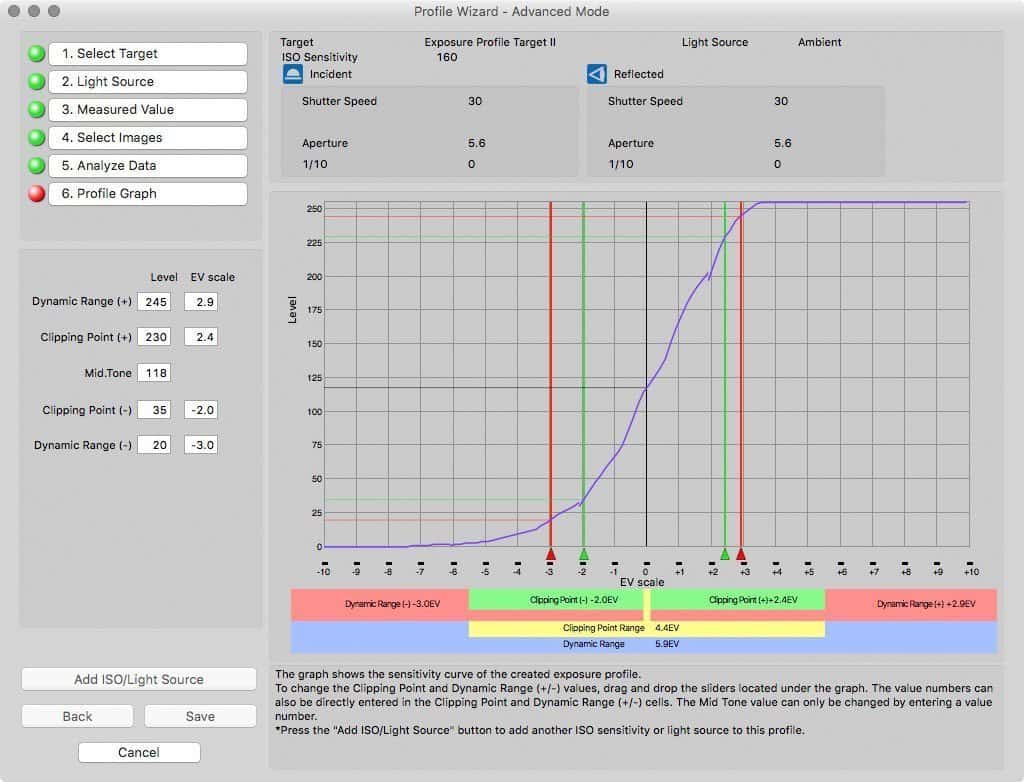
Sekonic DTS Initial Profile Graph
In Ansel Adams’ Zone System, the dynamic range is actually from zone 1 to 9, so zones 0 and 10 are not included, because they were considered too extreme to be useful. The initial dynamic range set by the Sekonic software is closer to this than what is actually useful in modern digital images. We’ll talk more about the Zone System in a follow-up episode, probably next week.
Digital Dynamic Range
For digital, especially if you are exposing to the right when shooting, our useful dynamic range is much closer to the full range from full black to pure white, because there is information being recorded right up to these values that can be used if necessary. So I choose to move both of the dynamic range pointers right out, to span from 0 to 255. I’d actually say that the only values that are truly useless in a well exposed digital image are 0 and 255, so I use these values because I want to see these exact points on my light meter scale.
The clipping points are more subjective, and will be up to you where you put these, but my tests show that I can push my images very close to the digital dynamic range extremes, so I’ve been setting the low clipping points to two stops above total black and the high clipping point to one stop below pure white, as you can see here (below).
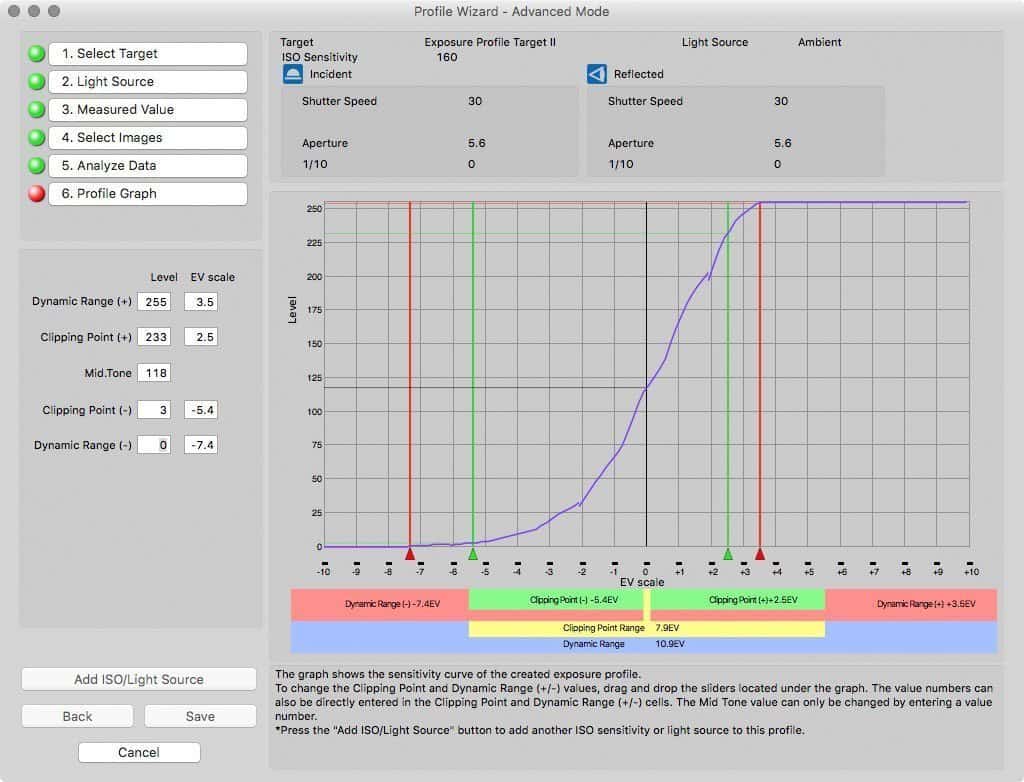
Sekonic DTS Adjusted Profile Graph
If you shoot additional ISOs or Flash light source profile images as well, you can add these to the profile from this dialog, but if you keep your JPEGs you can play with that later too, so for now, click Save. I already have a profile at ISO 100, so I called this one “Canon EOS 5Ds R ISO 160” for now.
I actually found that adding multiple ISOs to the same profile leaves you with some funky settings showing up on the meter in between the two ISO settings, so I’ve not loaded any multi-ISO profiles to my meter at this point. If you use single ISO profiles the dynamic range and clipping points remain the same across all ISO and I think I’d rather see that as opposed to the funkiness I was seeing.
Transferring Profiles to the L-758D Light Meter
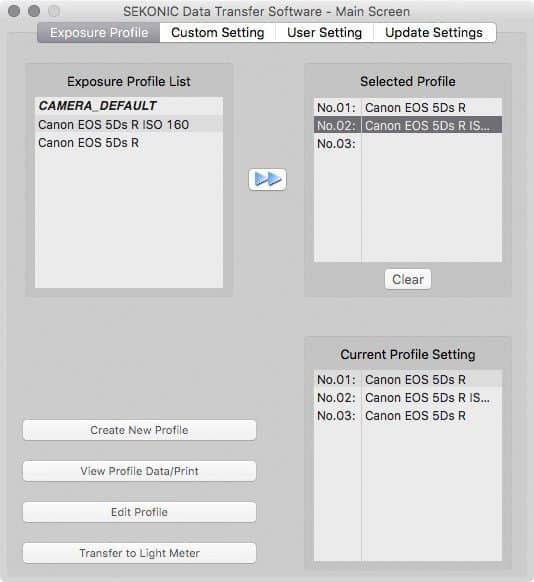
Sekonic Transfer Profile to L-758D
With your L-758D turned off, plug in the USB cable that it comes with, and you should then see the meter connect in the Data Transfer Software. Select the profile or profiles that you’d like to transfer and add them to the right Selected Profile list, and then when you’re ready, click the Transfer to Light Meter button.
You can also edit your profiles from this dialog, and change your clipping points etc. You could even create both an aggressive and conservative profile from the same profile data, and transfer different copies of the profile to your meter for comparison.
Note that when you start editing existing profiles, the clipping and dynamic range settings are saved separately for Incident and Reflected meter modes. You may actually want to set these differently, and these are displayed accordingly as you switch between these modes on the light meter, but if you want them to be the same, ensure to modify both settings in your profile before transferring it to the meter.
Turn the power of the meter off before disconnecting it, but once you have your profiles loaded, you are ready to go have some fun with your new profile loaded to the L-758D light meter.
So What’s the Dynamic Range of the 5Ds R?
Well, my ISO 100 profile shows me a total dynamic range of 11.5 stops (-7.1 to 3.4 EV), and my ISO 160 profile shows me 11.9 stops (-7.4 to 3.5 EV). If I’d made both of these profile under exactly the same light, with exactly the same exposure settings, I’d be thinking that I have more dynamic range at the higher ISO, and that may be the case, but DxO Mark have the 5Ds R dynamic range at 12.4, larger than both of my profiles, so I’m not going to get too hung up on this.
It does mean though, that my current profiles, even with the dynamic range set right out at 0 to 255, is perhaps still a little bit on the conservative side, but we’ll look at an example from the field and check these values in Photoshop in a follow up episode, probably next week.
Do keep in mind that I’m talking about the full range of values captured when I use the term dynamic range here, not Ansel Adams’ definition of the term. In the follow up episode to this week’s post, I’ll talk a little more about the Zone System, and how we can analyze our scenes and images to get the most out of our camera’s digital dynamic range.
Show Notes
Sekonic L-758DR : https://mbp.ac/Sekonic-L-758DR
Sekonic Exposure Profile Target II: https://mbp.ac/ept2
Sekonic DTS (Data Transfer Software) : https://mbp.ac/sekonicDTS
Subscribe in iTunes for Enhanced Podcasts delivered automatically to your computer.
Download this Podcast in MP3 format (Audio Only).
Download this Podcast in Enhanced Podcast M4A format. This requires Apple iTunes or Quicktime to view/listen.

Thank you so very much for explaining this process, I had previously just thrown my hands up in the air and walked away from it. I own the 478DR.
You’re welcome JH Photo. I hope this get’s you through the process. It’s not difficult, but I did make a few changes to the original Sekonic instructions, which I believe make this process easier.
Hi Martin, great article! I’m having the same issue as u had regarding L758 not being recognised by my iMac (El Capitan) when I plug it in. The USB symbol just flashes when I plug it in. When u ran the AutoUpdateUtility were running on version 4? I see there is version 5 but on the Sekonic website they say this version is only for the L478.
Thanks very much
Dave
Hi Dave, yes, when I ran the auto update utility I was on version 4. It was updated to 4.0.3. I have just tried to connect the L-758D on my iMac and it still connects fine, but I tried on my MacBook Pro, and it no longer connects. Both my iMac and MacBook Pro are running El Capitan at 10.11.4, so I don’t know why it works on one but not the other.
I also tried updating to v5 of DTS, as I was prompted to update, and only after that did I see a message not to update, because the L-758D does not support v5. This is really pretty poor on Sekonic’s part. The L-758D/DR is one of their most popular light meter. It’s time to get your fingers out guys!!
Sorry I can’t provide much help Dave. The only thing I can suggest is trying on a different computer if you have one around.
Hi Martin, thanks for your reply. Yes very poor from Sekonic – just hoping they update Version 5 SOON so it’s compatible with L758! In the meantime I’ll try what u did and run the AutoUpdateUtility on my version 4 and hope it works!
Cheers.
Hi David,
Please don’t run the autoupdate now, as this will jump you to v5 automatically, and then throw a message to tell you not to do that. I had to go back to v4 using Time Machine because it’s no longer served by the auto-update servers.
You’ll need to download v4 from this page until v5 works with our meters: http://www.sekonic.com/united-states/support/downloads/dtssoftwareformacandwindows.aspx
Cheers,
Martin.
Hi all, there is a firmware update available now (through DTS 5.0) for the L-758 (version 22); here DTS 5.0 works now with the L-758 (Mac OS X).
HTH, Marko
Hi Marko, good news! I can finally get things up and running now! How did u do it as I just checked website and is still says V5 only for 458 series? Do u download V4 and then go from there. I removed all versions off my Mac (El Capitan latest IOS version) until an update V5 was compatible with L-758.
Cheers
Dave
Hi Dave, I just downloaded version 5 from the website and tried… I removed Version 4 before installing and it just worked (OS X 10.11.4 here, too); my first step was upgrading the L-758’s firmware.
Thanks for letting us know Marko.
I initially just tried updating to v5 when prompted to do so, and like before, it didn’t work. Before I updated though, using version 4, which did connect to the L-758D on one of my two Macs, I was able to update the firmware, as you’d mentioned that.
This in itself didn’t fix the issue, but then I noticed that you said you’d uninstalled version 4 first, so I removed that, and tried a clean install of version 5, and it connects to the L-758D fine now.
I still need to test on my MacBook Pro, which never connected, but at least my iMac is now connecting with v5, which is cool.
Dave, maybe you could try the firmware updater in the Sekonic folder. Once updated to version 22, you might be able to get v5 working with your 758 too.
Good luck!
Cheers Martin. Just tried it… followed your steps and it works a treat! Great stuff, thanks guys.
Glad to hear that David. Congrats! You can finally use your L-758D to its full potential. 🙂
Likewise I had trouble installing v5 on a mac running el capitan 10.11.4 WITH the L758 not being found by the s/ware, what I discovered eventually was not only do you have to remove any versions (move to trash) but also empty the trash, then install v5 (which says is only for the 478 meter), restart and it works..
I’m still wrestling with this especially when trying to create a profile using strobes. I’m limited with my range of f-stops. I can just make a -3 to +3 stop range with an f/2.8-22 lens. My light meter is the L-478D and I don’t have the optional 5 degree viewfinder attachment so obtaining reflected readings is very difficult. Is there another option other than f-stops for selecting the over / under exposure settings when using strobes / flash? Can you change the ISO? I know there’s an option for a mulit-iso profile but I haven’t even tried that one yet. In addition I still get the “the set level does not exist in the image” alert. Gear I’m using Sony A7II, Promaster PD300 strobes, Sony FE90 2.8 (to the 6 stop range) and the x rite colour checker passport. Great article btw. I’ll be back to your posts. Stumbled on it while troubleshooting. Thanks for your time.
Hi William,
I personally wouldn’t try to do this with ISO, and with flash you have only a limited range of shutter speeds to work with, so I would say using your aperture would be the best way. I’m confused as to why you can’t do this with your f/2.8 to f/22 range though. If you set your aperture to f/8, three stops below that is f/2.8 and three stops above that is f/22. Job done, right?
Cheers,
Martin.
Martin, thanks very much for your reply and advice. Yes the f/2.8 lens will just work but I still get the the “set level does not exist in the image” alert. Also, how critical is it to have a reflected measurement for the Data Transfer Software? I don’t have the 5 degree viewfinder so my reflected readings are extremely different than the incident. Thanks again and I’ll keep experimenting.
Hi William,
I see. I don’t really know what that is, or how to avoid it, so it’s probably best to contact support to find out why that is being displayed.
I wouldn’t think it’s a problem to not be able to do the reflected readings.
Regards,
Martin.
Hi Martin,
I spent all evening trying to set the same custom exposure profile for incident and reflective metering.
Finally I managed to fix it,thanks to your post, God bless you 🙂 But just wondering…. is there any reason why as I transfer my profile with dts incident profile scale is +/- 3,5 EV and reflective dynamic range is +/- 2,5 EV? I mean, should reflective readings for any reason be more “conservative” than incident ones in the light meter ? I’m using a 5d3. Thank you
Hi Miceli,
I’m pleased my post helped. 🙂
I just checked the dynamic range on my L-758D and see that there is no difference between reflective and incident dynamic ranges, so I’m not sure what to tell you. Maybe if you could take a photo of the LCD on your meter in both states, and send them to me via Dropbox or something, I could take a look and see if I can offer any advice. Or maybe contact Sekonic support, as they probably know better.
A Happy New Year to you!
Regards,
Martin.
Thank for your reply, I appreciate it. Finally I found it on my own.
It’s a setting of dts software that allows you switching between the two parameters. I’ll set both the same, incident and spot metering will have the same dynamic range. So my metering will be shown in the same scale.
I’m going to try shooting my highlights at +3,5 as EV graph suggest my camera is capable of. It scares me a bit, but It’s time to check the meter if it worth the money.
Happy new year!
Regards from Rome,
Filippo
Hi Filippo,
I actually took a look at my own profiles again yesterday and wondered if what you did might have been the solution, but I couldn’t remember if I had to change both metering method results when creating my profiles, and I didn’t mention this in the post, so I didn’t mention it. I’m pleased you found out what the problem was though.
Thanks for letting me know.
Regards,
Martin.
I have recently purchased a L758DR. I gone through the process creating a profile for my D800 and I just noticed the the clipping indicators change when I switch from incident to spot metering. When in incident it shows about 7.5 stops between my clipping points but when in spot metering it drops down to around 5. I don’t understand why it does this
Hi Kelly,
As Filippo mentioned above you have to change these parameters for both spot and incident when creating your camera profile. There’s a pull down to select the metering mode.
Cheers,
Martin.
Sorry to waste your time. I read through the comments after posting this. Thank you. And your article was very well done. Look forward to seeing more of your stuff.
Kelly
No problem at all Kelly. Glad this all helped.