For a while now, I’ve been using the Black Rapid R-Strap and Double Strap when using two cameras, but during my recent Antarctica expedition, the camera body dropped off the lens a few times. Had this happened while I was walking down the gangplank to the Zodiac, it would have cast rather a gloom over the voyage, to say the least. It did happen a couple of times in the Zodiac, but I was lucky that the bottom of the Zodiac wasn’t swamped at the time. Anyway, with a little advice from David Burren, who’d organized the expedition that I was co-hosting with him, I have made a few adjustments to how I use my straps, so that even if the body should come away from the lens, the body won’t fall to the floor. Today, I’m going to talk about and show you a few pictures to explain what I’ve done.
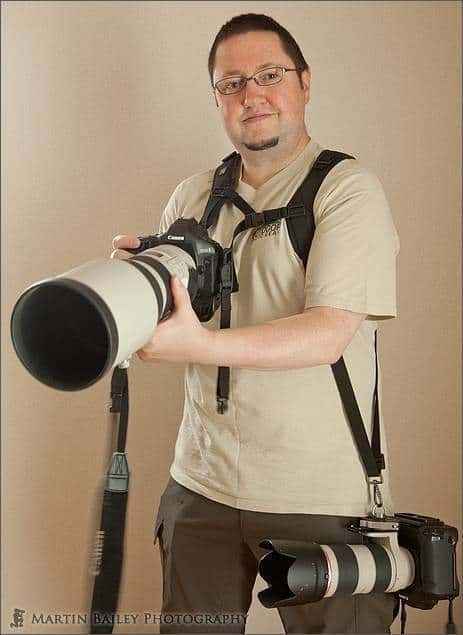
Before we look at the new safety measures I’ve taken on David’s advice, let’s first look at the system I’ve been using for the last couple of years. I’ve been using the Black Rapid R-Strap for a while, and actually started to use two of them, crossed across my torso, so that I could carry two bodies simultaneously, but then, about a year and a half or so ago, Black Rapid brought out the Double Strap, which is basically a harness with two straps, so the two cameras hang down by your sides, and the weight is nicely distributed across both shoulders, without pulling you one way or the other, or pinching etc.
I really like this system because of the way the weight is distributed. The biggest benefit for me is that the weight is central to your body, and doesn’t pull you forwards like a camera strap around your neck, with the camera hanging down in front of you. Even with just one camera and a hefty lens like the 70-200mm or the 300mm F2.8 lens, if you have that hanging in front of you for a few hours, or even a full day, it really starts to put stress on the small of your back. Having done this in Hokkaido years ago, standing in the same place all day can really take it’s toll on the old back.
(BTW, the strap you can see dangling from the 300mm F2.8 lens in the above image is the lenses strap, not the strap on the camera. I’d take that off while using the Black Rapid Double Strap.)
Of course, these are all related to the comfort of using the system, but the fact that these straps don’t actually lock the camera into one place, and the camera just slides up the strap when you use it is their foremost benefit. You run and gun with either camera when you need it, and just let it fall back down by your side when your done with it. When shooting wildlife I often have a camera on either side, then my 600mm on a tripod in front of me, so I can switch between all three cameras as quickly as it takes me to realize that I need to change.
I also always have my longer lens on my right side, just so that I can remember which one to reach for. Obviously this is just my personal preference, but I find deciding on little rules like this, like what goes in which pocket of the photographer’s vest, help to keep shooting as smooth as possible.
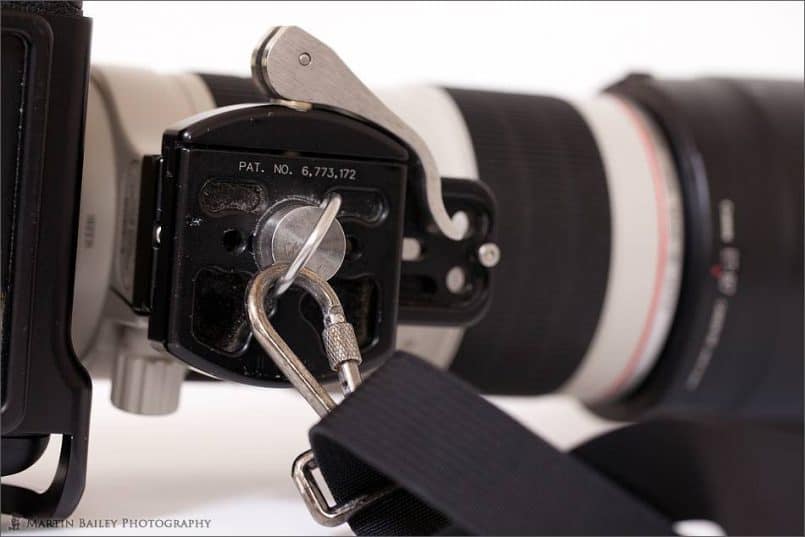
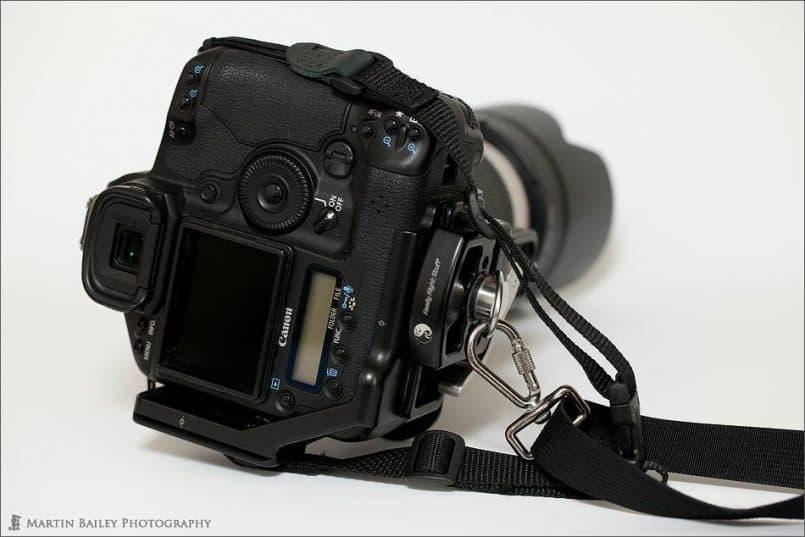
Note too that I use a Really Right Stuff quick release clamps (below) with a screw thread and screw the Black Rapid fastener directly into that. This allows me to clamp the strap to my camera body or the tripod shoe on larger lenses in just a second or two. The same goes for releasing. This means of course that I have to have a Really Right Stuff plates on all of my cameras and lens tripod shoes, but that’s how I have my system set up anyway.
Now, I had never had this problem before, but while walking back to the Zodiac base on the Falkland Islands the screw came loose, and the fastener came away from the Really Right Stuff clamp. Luckily this was while I had the lens cradled under my left arm, so it didn’t drop to the floor, and it might actually be because I was supporting the weight of the lens that the screw was able to come loose.
I’ve actually walked miles with the camera hanging down on the Double Strap, attached to the tripod shoe with this very setup, and never had a problem, but it was still unnerving to see this happen. Because of this, and the fact that the bodies have dropped off the lens a few times, when I’ve had the Double Strap attached to the lens, not the body, made me really think that I needed to secure this setup in some way. It was then that David showed me what he does with his R-Strap, and that is what I’ve now started doing, and am very happy with, for a few reasons that we’ll get into now.
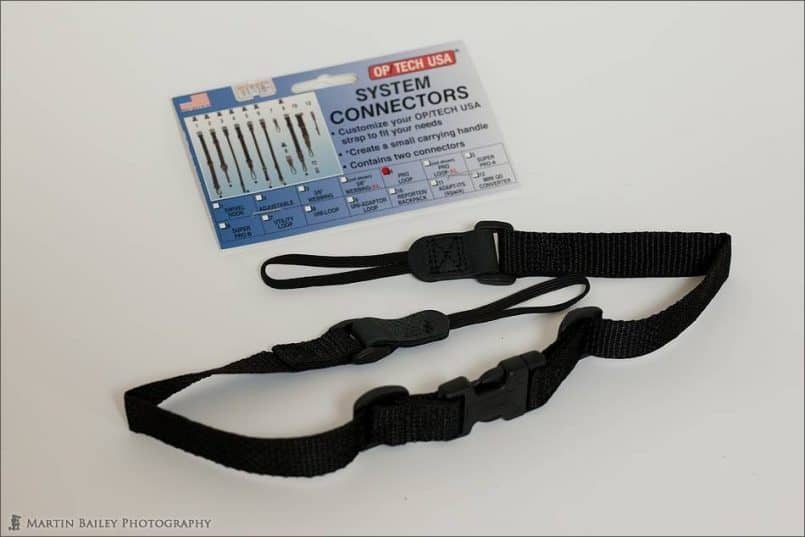
I can’t recall if David’s were the same brand, though I think they were, and they definitely had the same design, but I bought two new OP/TECH USA camera straps, as we can see in this photograph. I should clarify before we continue that this is not to replace the Black Rapid Double Strap. I always keep a camera strap on my bodies, as the default way to carry the cameras, especially when I’m only using one at a time. I have always bought straps that can be detached easily though, leaving just the end of the straps that attach to the camera still on the body. This has multiple benefits the first being that I can remove the strap when the camera is on a tripod. This stops the strap from getting in the way, and also stops the wind from catching the strap and blowing it around, which can cause unwanted vibration, which we of course don’t want, especially when doing long exposures.
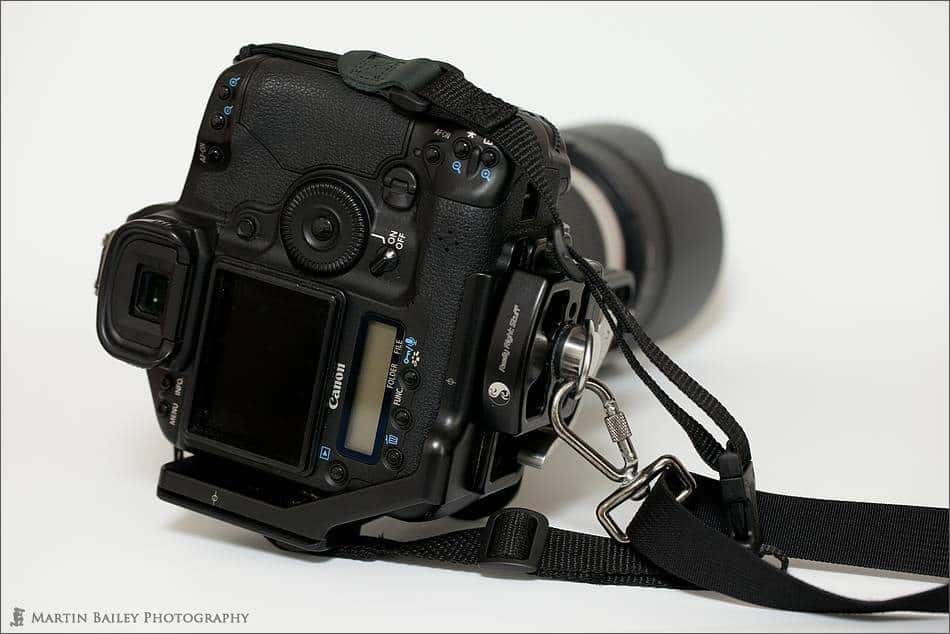
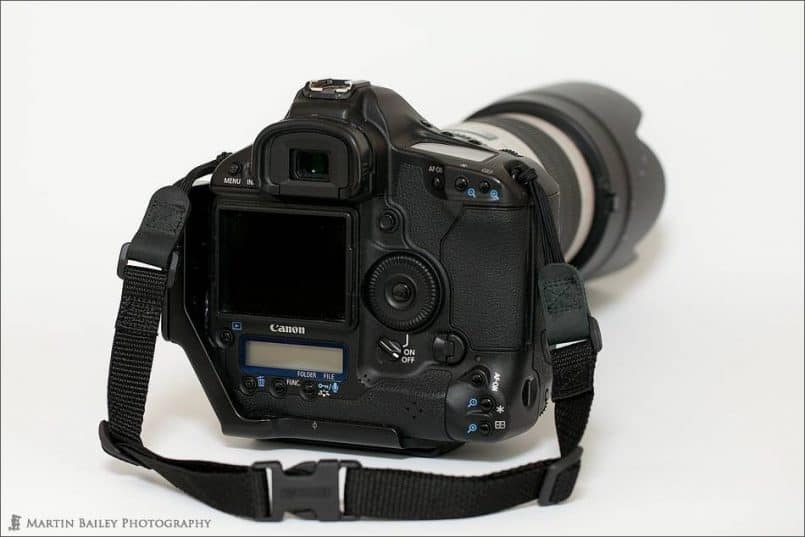
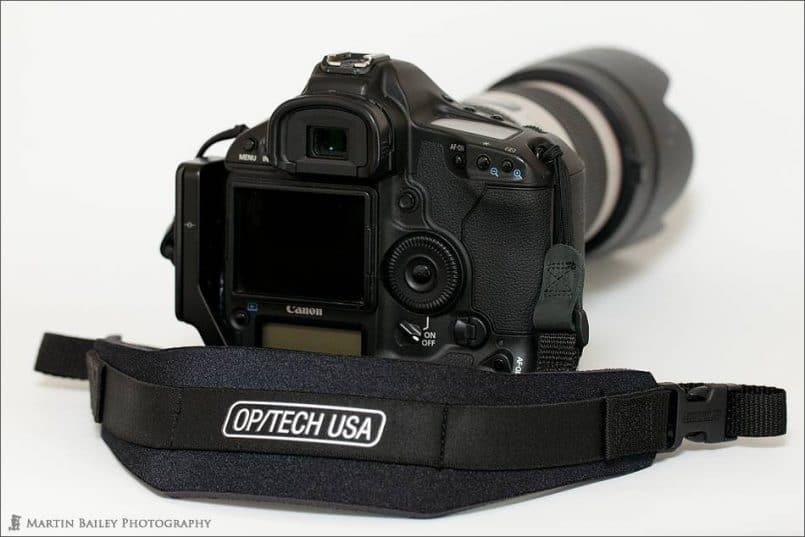 The second benefit is that I can also easily remove the strap when using the R-Strap or Double Strap from Black Rapid. Until now though, that has meant that I’ve been placing the fate of my camera in the hands of something attached to the strap with a small screw and a quick release clamp. Some of the OP/TECH USA straps though, come with quite long sections of strap left on the camera when you detach the strap itself, and more importantly, they leave the one male, and one female clip on the camera, so you can clip these two shorter straps together, to make a small hand strap.
The benefit of this of course, is that if you leave these sections long enough, you can couple them together through the R-Strap or Double Strap, so even if something goes wrong with the screw or quick release clamp holding them to the camera or lens, the OP/TECH USA strap will stop the camera body from dropping to the floor. This gives me so much more peace of mind now, when using the Black Rapid products.
Here’s another cool thing about the OP/TECH USA system that I’m very happy with. Firstly, let me tell you that I bought two of their straps that both use what they call the Pro Loop. This is the part that actually goes through the two little strap wholes on the camera body. When I was in the store, I decided to buy two different straps from OP/TECH. One was the Classic Strap, which about the same width as the sort of straps that Canon ship with their bodies, but it’s neoprene, so it not only stretches, making the camera feel lighter around your neck or over your shoulder, but it also stays put on your shoulder, which is very useful if you have wimpy round shoulders like I do.
The second strap I bought was a wider strap, which will obviously distribute the weight of the camera more. It’s a little sporty looking though, so I figured I’d get the orthodox classic strap for when I need to keep up appearances, and the wider strap when I’m able to rough it a little more. Because I ensured that I had the same Pro-Loop to attach to the camera on both straps, I can interchange them between bodies easily too, another bonus, which is this second cool thing I wanted to talk about.
Here’s the last thing that I thought was very useful and kind of OP/TECH USA for selling. I was looking for a third strap, as I have three camera bodies, and wanted the same system across all of my gear, when I noticed a small packet with just the Pro-Loop System Connectors, sold separately. This is brilliant! I’ll never use all three cameras dangling off of me with their straps, so I don’t actually need three straps, but being able to buy the Pro-Loop System Connectors separately meant that I could save money by just being this for my third camera, then attach a strap as necessary when I use that third camera. How cool is that!? Thanks to OP/TECH by the way, for making this great system available and saving me money.
There are links for all of the items that I’ve mentioned today at the bottom of this post. Apart from the Really Right Stuff clamps, the Black Rapid straps and OP/TECH USA straps are B&H links. These are affiliate links, so although the cost of the goods to you remains unchanged, I actually get a little bit of income when you buy with these links, so if you do buy any of this stuff from B&H, please use my links, and help to support this Podcast.
Not a very long show this week, but I as I wanted to explain this in some detail, I figured I’d put it out as a dedicated topic. I will be moving on to a travelogue style update of my Antarctica expedition in the coming weeks. Hopefully you already noticed the video that I put into the Podcast feed last week, in which I have already shared my photos from that amazing voyage.
One of the reasons that this week’s episode is late actually is because I have been working hard on a couple of other things that I’d just like to update you on too. Firstly, I was trying to figure out how to create eBooks in the new Adobe InDesign CS5.5, which dynamically re-layout the content on the page when you switch from holding your iPad horizontally to vertically. I went through a load of tutorials, and was after spending a lot of time, able to put a document together which switched formats as I wanted. Then though, I realize that the only way I can publish this document, is to throw a stash more cash at Adobe, to use their Digital Publishing Suite, and would have to continue to pay a fat monthly fee as well, to keep the ebook up for sale. One of the main reasons that I threw $800 (Yes, the Master Collection costs $800 to upgrade in Japan!) at Adobe to upgrade my Master Collection was because I wanted to create this kind of eBook, so I’m not happy that they’ve taken this root, and I’m hoping that they release a more reasonable plan very soon.
Just to clarify, I am able to create eBooks, in the ePub format, which is pretty much like what you see in Kindle books, but honestly, I don’t like the look of Kindle books. I wanted to create something as beautiful as what you can do with a PDF, but that dynamically switches between horizontal and vertical layouts, like the WIRED Magazine. I can create this kind of publishing, but can’t export it from inDesign without singing up for the Digital Publishing Suite, which really sucks.
The other thing that has taken up a lot of my time this week is that I’ve been working on my new portraiture business Web site. I still have a little tightening up to do, but the site is now live if you want to take a look. It’s on a separate domain called www.yourportrait.jp, and it’s also now linked from the sliding door graphics that I have on the top portal page at martinbaileyphotography.com, so you can jump from their too if that’s easier to remember. Let me know if you have any feedback on the site too. It’s brand new and probably still has more work to do than even I realize. Also, if you are in Tokyo or the surrounding area, you might want to consider using my services! 🙂
Podcast show-notes:
Images and Transcript: https://mbp.ac/288
OP/TECH USA Pro Loop Strap (Black): https://mbp.ac/otpls
OP/TECH USA Super Classic Strap-Pro Loop (Black): https://mbp.ac/scpls
OP/TECH USA System Connectors (Set of 2): https://mbp.ac/otscs
Black Rapid RS DR-1 Double Strap: https://mbp.ac/brdr1
Black Rapid RS DR-2 Slim Double Strap: https://mbp.ac/brdr2
Really Right Stuff B2 LR II Quick Release Clamp: https://mbp.ac/b2lr
Audio
Subscribe in iTunes for Enhanced Podcasts delivered automatically to your computer.
Download this Podcast in MP3 format (Audio Only).
Download this Podcast in Enhanced Podcast M4A format. This requires Apple iTunes or Quicktime to view/listen.



Hi Martin,
was thinking about getting one of the BR straps for a holiday trip as I usually have the camera/lens on a wrist strap. But I don’t think the wrist strap is up to it for a 70-200mm.
My question is, I have heard a lot about thieves using knives to cut the strap and stealing the camera, is the BR strap capable of averting this, or is it easily cut?
Why strap manufacturers don’t weave in some steal fibres into the straps to help avoid this sort of theft?
Cheers
Owin
The Black Rapid strap is just nylon, like most others. I imagine in someone went to cut it, it would cut.
Personally though, if someone is ready to cut my camera away with a knife, I’d rather let them. If I make it difficult for them, it might be me next. Insure your gear for when you are away from home, and hope that the bad guys don’t target you. That’s my advice.
Cheers,
Martin.
I do something similar, but use the Upstrap QR Loop attached to one side of the camera body. The loop goes around the R-Strap. It works well but your solution is a little more elegant.
Martin — Your portrait photography site looks great! You have a clear ability to capture portraits that clearly and warmly express happiness of your subjects. People are bound to feel a connection to these photos. I wish you very good luck with this aspect of your business. Frank
Good to hear that you’re sorted Gary. I’m sure your way works fine too.
Frank, thanks so much for the kind words. Japan still doesn’t do this sort of portraiture a lot, but there are a few people starting, and doing a good job. I’m hoping to carve my own little niche in this space too. 🙂
Cheers,
Martin.
Martin, I highly recommend Photobiz for portrait websites! Not only do they have amazing templates, a shopping cart, client viewing, and mobile sites, but their customer service is absolutely incredible! If you get a chance, talk with David Hutnik, he’s one of the best human beings you’ll ever have the pleasure of speaking to!
http://www.facebook.com/dhutnik
http://www.photobiz.com
Hi Byron,
Thanks for the recommendation. I actually don’t need any additional sites though. I’m hooked up with PhotoShelter if I need to create light-boxes or sell direct, but that’s not part of my portraiture model. I’ll certainly keep Photobiz in mind though, if the need arises.
Cheers,
Martin.
Hi Martin.
Only listened briefly, bt was it this podcast where you were mentioning your frustration at Adobe for extracting more money from us to enable us to publish E-Pub Books?
I am with you, but I found this tutorial from Terry White who shows how to export an InDesign document to E-Pub format.
If that is something you would like to do then this may be of use.
http://layersmagazine.com/creating-ibooks-epubs.html#more-14170
Regards,
Nick
Hi Nick,
I know how to create and export ePub books. The problem is, standard ePub books don’t look very good. If you have seen a Kindle book, you’ll know what I mean.
What I want to be able to do is create a verticle layout, and a horiztonal layout, and package them together into one Article, so that people who view on an iPad see the correct view depending on the orientation they are holding their iPad in. This is like the iPad version of WIRED magazine. If you’ve seen how that switches between vertical and horizontal, you’ll know what I mean. It’ such a rich experience compared to the ePub format.
Cheers,
Martin.
Hey Martin,
I have to tell you that you can’t just casually mention that your body dropped off your lens a couple times without providing the details of what happened! How did your body come loose from your lens? What a nightmare. And how did the BR fastener come loose? Didn’t you talk about using the updated fastener with the rubber base in a previous episode? I would think that would prevent it from coming loose. Or maybe you just mentioned that the fastener had been updated with the rubber base.
Anyway, thanks for another interesting podcast. I too use the Op/Tech Pro Loop system and I really like it. What hadn’t occurred to me is connecting the two fasteners to create a hand strap – a very useful idea.
Tim
Hee hee. Truth is Tim, I don’t know why the lens drops off the lens. I’m thinking that I must have at some point touched the lens release button, then the lens just gradually rotated to the point that it comes away from the lens, but I had this happen to me once a year ago as well, and so always ensure that I carry the lens with the button away from me, to avoid pushing it.
Apart from that, I really don’t know how this happens. I thought about asking Canon, but I know they’d just fob me off with an answer about me needing to use the strap that they provide or something.
On the Black Rapid, yes, I do use the rubber bottomed fastener. I think this came loose because I was supporting the weight of the lens myself, and so the faster had some play, but this has never happened to me before. I check that it’s tight quite often too, and have never even felt it coming loose.
I found myself using the 5D Mark II this week with just the Pro Loop connectors linked together as a hand strap. It was just around the studio, but it was nice to have something to grab when I reached for the camera.
Cheers,
Martin.
I know this is a late reply but I just stumbled on this podcast. It requires a lot of things to line up for this to happen. I posted a video on this very issue.
https://vimeo.com/29227950
This has happened to me twice in a row one day. I now have a carabiner with parachute cord attached to the strap as a safety line.
Without having to watch me blabber for several minutes, the quick and dirty is this:
If your strap is attached to the tripod ring like normally (aligned on the lens in the horizontal mode) and ..
The strap length is enough to allow the camera to swing near your pocket or other item that may trigger the lens release button and…
You have a battery grip on your camera or a 1D to provide torsion.
The camera lens release button can be hit by objects in your pocket while walking as the camera is swinging by your hip. It’s rare but happened enough to me to stop carrying objects in my right pocket.
Thanks for this, I’ve been trying to decide what to do for a while, I’ve just bought a Canon 28-300L for travel (hoping to have to carry only one lens), but there’s no way I can carry that thing around my neck it’s a monster. I’ve just bought all of the bit’s you’ve mentioned for both bodies thanks!!
I’m happy this was useful Nigel. Thanks for the update.