

Today I’m going to walk you through a few tips for shooting images to later stitch together to create high resolution panorama photographs. We’re going to cover two methods for finding the No Parallax Point which helps with avoiding parallax shift, as well as looking at some easier methods of shooting that also work great.
 Today’s episode is actually an adapted version of a topic I cover in detail in my Striking Landscapes eBook from Craft & Vision. Although I’ll try to cover the actual process of stitching the images together on the computer at a later date, if you would like this information sooner rather than later, perhaps consider picking up a copy of this eBook and following along with that, if you don’t already have a copy that is. Otherwise, we’ll get to that in a future episode.
Multiple Ways to Shoot Base Images
For panorama photographs comprised of multiple images stitched together, there are multiple ways to shoot your base images, and infinite levels of intricacy depending on how much work you are prepared to do for the end product. I use a number of methods depending on the situation.
On rare occasions I simply crop a single frame down to create a panoramic aspect ratio image, but that results in a small image, which won’t be optimal for large prints. I have printed single frame crops at 40″ wide though, having blown the image up with onOne Software’s Perfect Resize, so if there are reasons for shooting a single frame and cropping, such as having a lot of moving elements in the scene that would make sticking virtually impossible, then I’ll do that, but like to avoid it when possible.
Hand-Held Panoramas
If I’m running and gunning I will sometimes simply find my scene, flip the camera vertically, and shoot a series of hand-held images. With the stitching software being so good these days, this method is generally fine, and although we’ll go on to talk about much more complicated methods today, depending on the situation, I really don’t mind when this is my only option.
This method also works well when photographing from a rocking ship, like this photograph (below), which was stitched together from a series of frames shot hand-held from the stern of a rocking ship heading down the Beagle Channel in Argentina, on my way to Antarctica. There’s little point in using a tripod from a moving base, and our bodies actually compensate for the rocking quite well as we automatically try to stop ourselves from falling over.
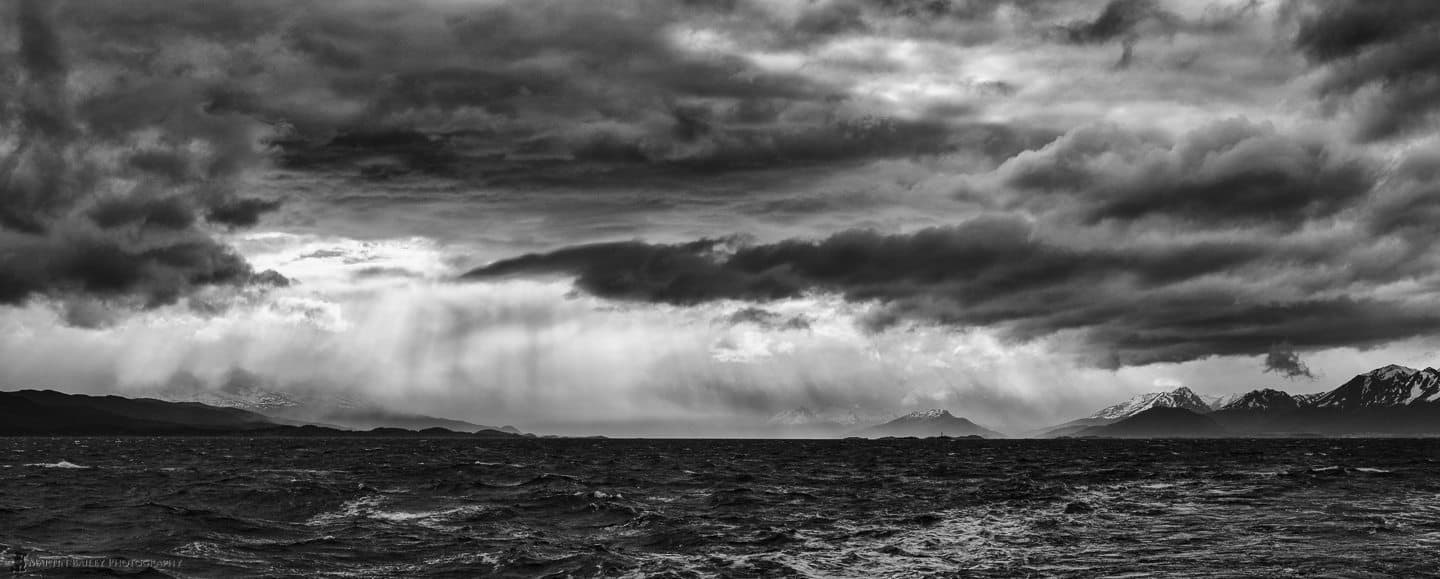
Beagle Channel 2012
Lock Down Exposure
One important thing to remember when shooting for panoramas is that if you shoot in an automatic exposure mode such as Program or Aperture Priority, your resulting images will have various exposure levels, and this makes it very difficult to create a consistent look across the stitched image. For example, the sky might have bands of varying brightness, which obviously looks terrible. To overcome this, it’s generally better to lock your exposure down in Manual mode. If you prefer an automatic exposure mode for your general shooting, get your exposure where you want it to be with your typical shooting style, but then make a mental note of your settings, then go to Manual, and set your camera to those settings.
Take a look at the entire scene you intend to shoot when you do this, and set your exposure for the brightest part of the scene. Although it’s possible to deal with dark shadows later, to give your image the best chance, use the ETTR (Expose to the Right) technique discussed in Episode 381. If you have any specular highlights, you might choose to allow them to overexpose a little, but try not to overexpose much of the image or you will lose detail in those areas.
Shooting from a Tripod
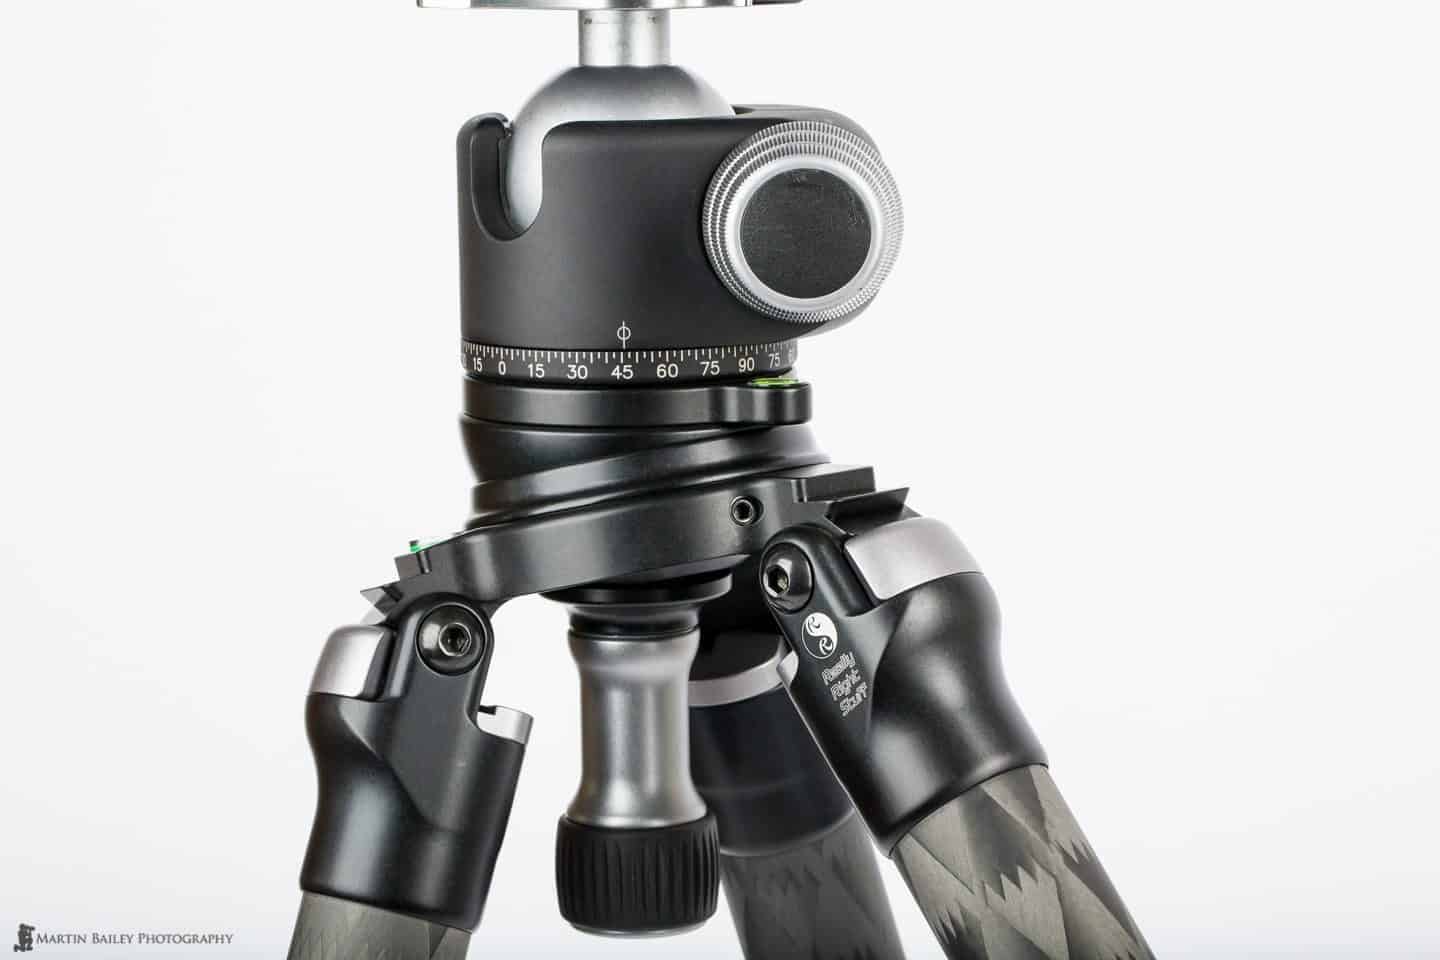
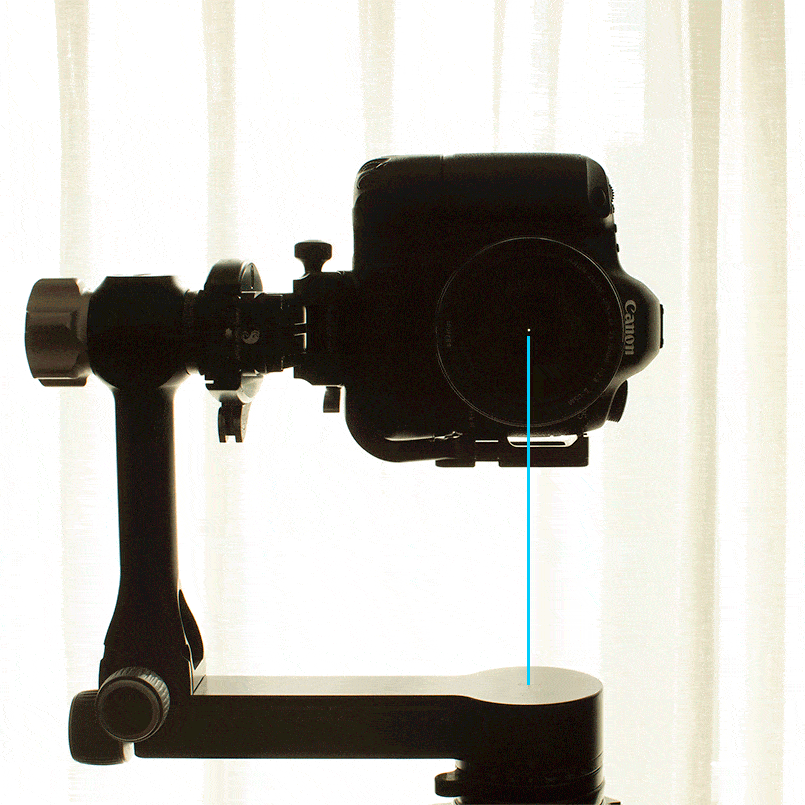
When shooting for stitched panoramas with a little more time, I try to use a tripod. I often use the 70-200 mm lens with a tripod foot, and rotate the camera and lens in the tripod ring to keep the centre of gravity over the rotation axis of the tripod for better balance and to stop the camera from moving sideways as I rotate the camera.
I generally use a Really Right Stuff L-bracket on my cameras, so when I shoot panoramas with a shorter focal length lens like the 24-70mm, I can easily flip the camera on its side as shown in this photo (below). The centre of the lens remains over the rotation axis of the tripod to help stabilise and stop the camera from moving to the side as I rotate the camera.

RRS L-Bracket Orientations
With the camera flipped over as in the right-most example here, it swings a lot as you move the camera for each frame, causing parallax issues that we really want to avoid. Even the first two example can cause parallax issue, but we’ll look at how to overcome that shortly. Of course, the reason that we flip the camera in the first place is because that helps us to avoid the lens distortion that generally creeps in more on the edges of the frame, which become the top and bottom of the images in the vertical orientation, and some of that will be cropped away later anyway. Plus, if you leave your camera in the landscape orientation, your panoramas end up very long and thin, and lower resolution than when you flip the camera vertically and zoom in a little bit.
Levelling the Tripod
To prevent your camera from creeping up or down too much as you pan, try to get your tripod as level as possible. Many tripods have a spirit level at the top of one of the legs, or the platform onto which you attached your tripod head. You can use this to get the tripod level by adjusting the length of each of the legs to compensate for any unevenness in the ground.
To save time when levelling my tripod, I use what’s called a levelling base. These come with a locking mechanism that you can unscrew to loosen the platform at the base of the tripod head, and you can then move it up to 15 degrees in any direction. This enables me to level the tripod head without having the tripod on even ground or painstakingly adjusting the height of each leg.
RRS Leveling Base Tilted Over
Panoramas Using a Ball Head
Since ball heads allow the camera to be moved around freely, you will also need to level your camera before you begin to shoot your series of photographs. Many modern cameras have a digital level built in, which makes it a breeze to level the camera. You don’t need to level the camera on the vertical axis, but ensuring that the camera is horizontally level will stop it from drifting too far up or down as you pan. If you don’t have a digital level built in to your camera, you can also use the small, inexpensive plastic spirit levels that fit into the flash hot shoe.
Errors Due to Parallax
OK, so shooting with a ball head from a levelled tripod will give great results most of the time. This is how I shoot the vast majority of my panorama photographs. But, it can introduce errors when stitching your frames together due to slight shifts in parallax because you are rotating the camera in front of the rotation axis of the tripod.
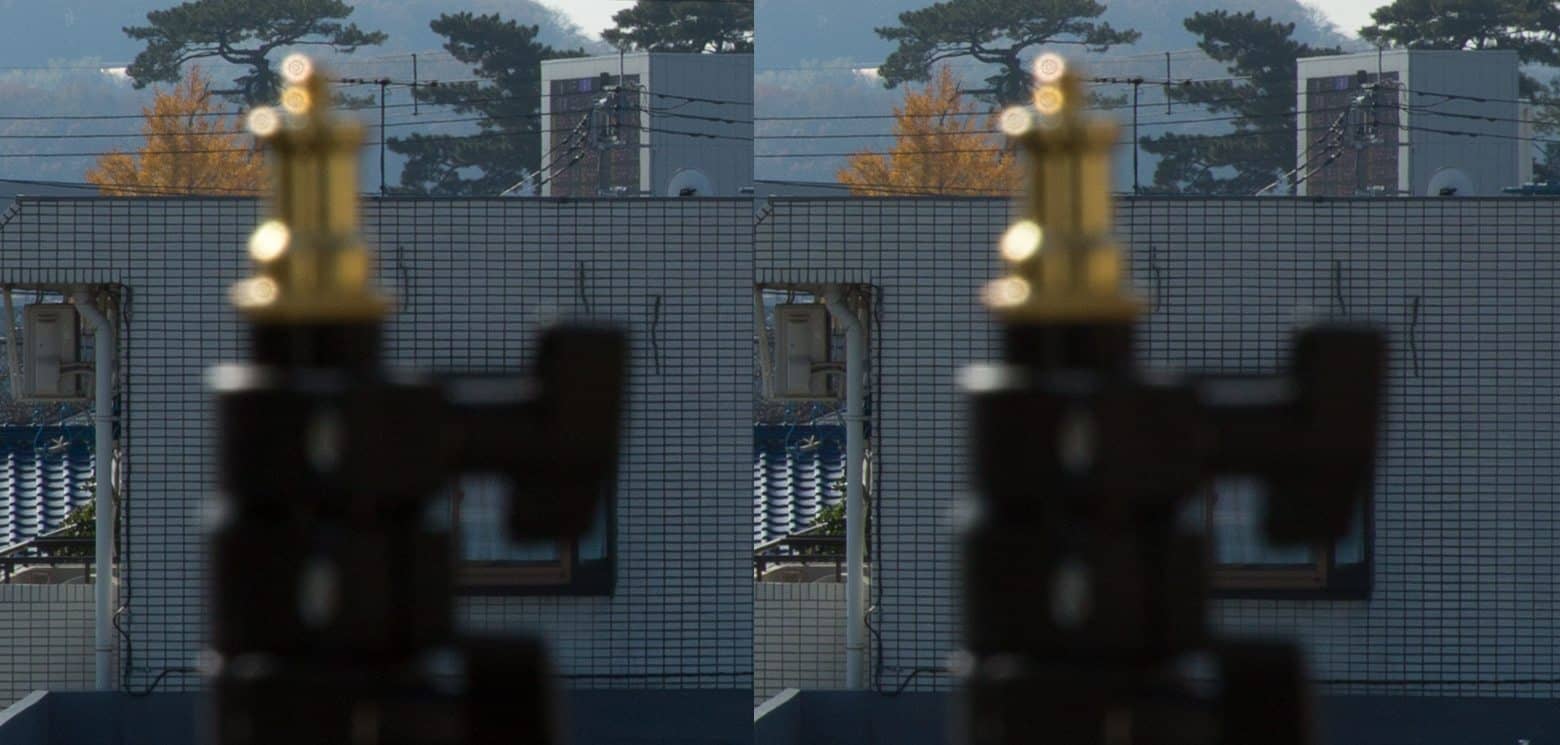
In this example (below) the images on the left were shot with the camera on a tripod using a ball head. I’ve merged the photos together for the sake of the illustration, but they are two sets of three photos shot with the crane ornaments on the far left, centre and far right of the frame as I rotated the camera. In the three images to the left, you can see that the relationship between the two cranes and the small plaque changes as I pan left to right, with the foreground elements drifting outwards. The set of three images on the right here were shot with a pano-gimbal head and the camera in a position to avoid parallax, and there is no parallax shift as the camera is rotated.
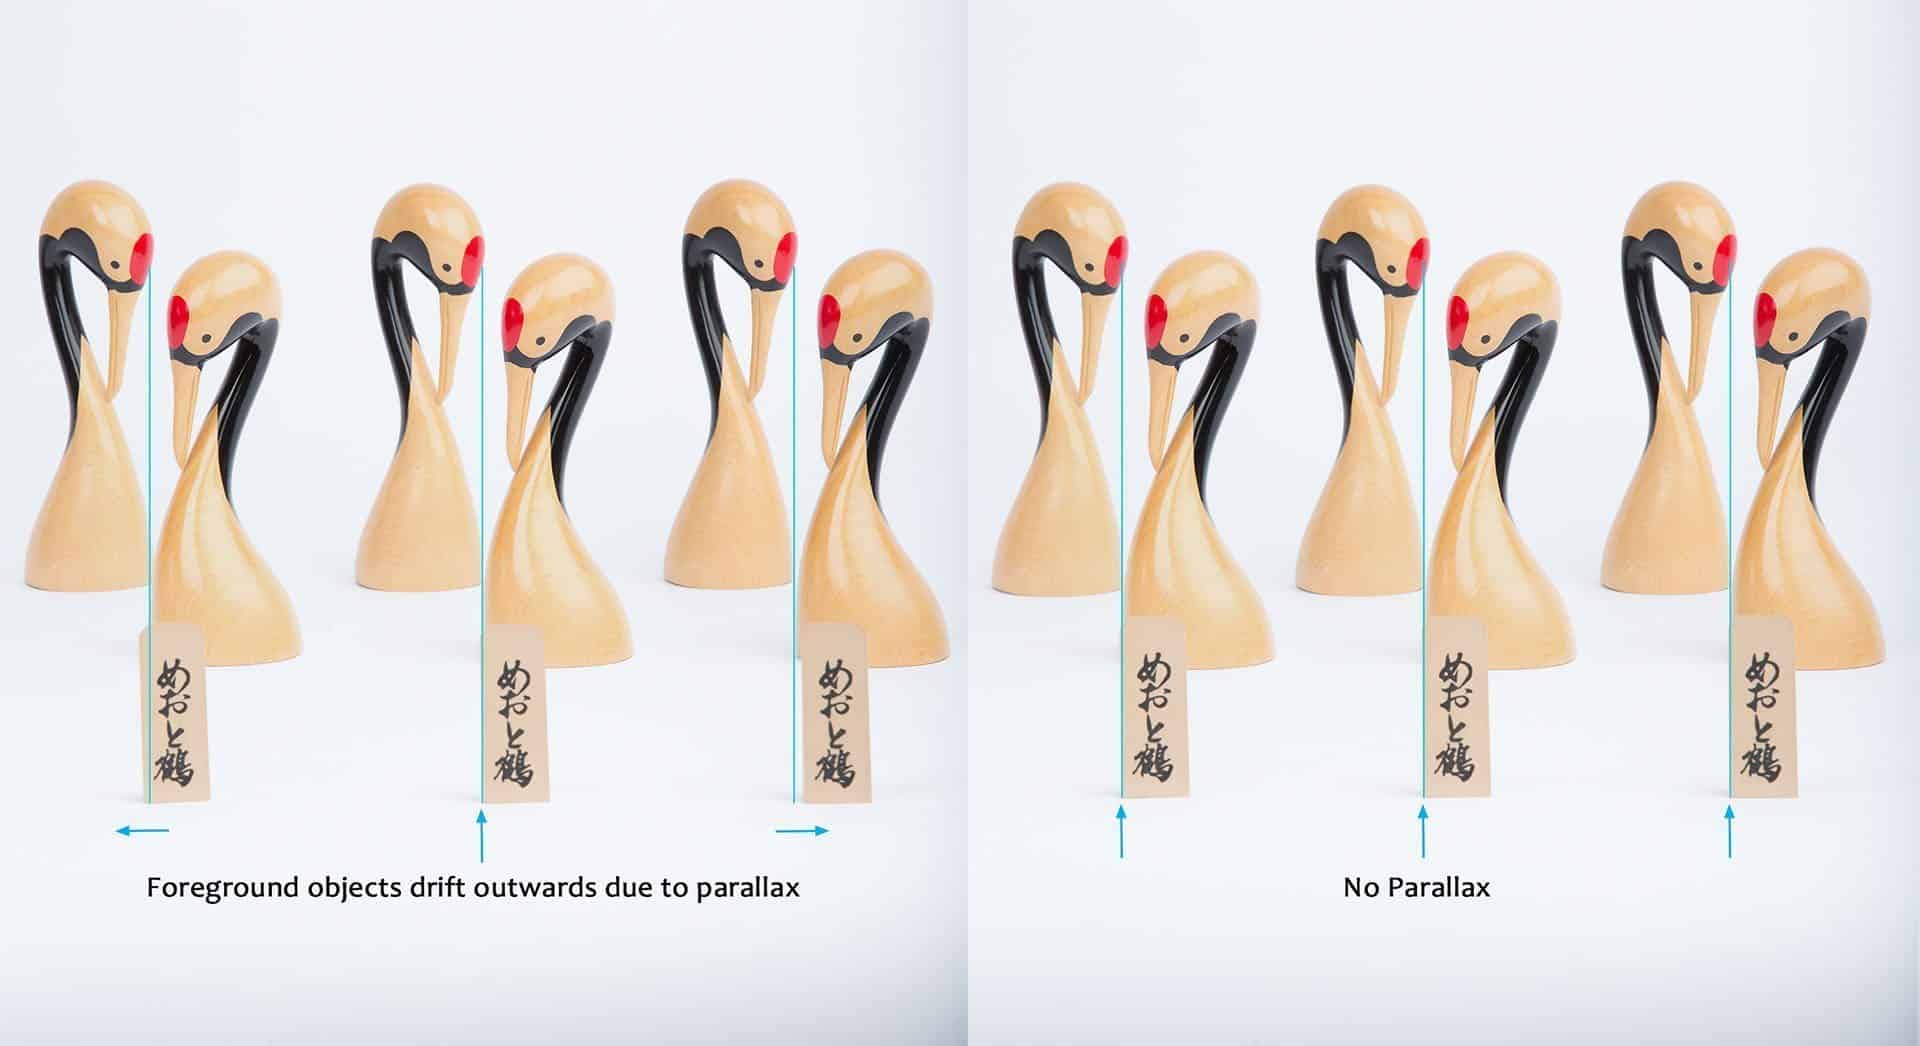
Parallax Examples
The No-Parallax Point
To understand why this happens, hold a finger up and look at it with one eye, then close that eye and open the other, and the finger will move in relation to the background. This is the parallax between our two eyes (and a well-understood phenomenon), but our camera only has one eye, so why is this such a big deal?
Really Right Stuff Pano-Gimbal Head
Next, hold up a finger and look at it with one eye closed, then move your head from side to side while looking at your finger. As you rotate your head one way, your finger will shift in the opposite direction in relation to the background. This is because your eye, or you lens in this example, is in front of the rotation axis, which right now is your neck.
Now try looking at your finger with one eye closed once again, but this time rotate your head around your eye, instead of from the neck. Your finger and the background will remain stationary as your head rotates around your eye. You just found your eye’s no-parallax point, which is actually the pupil. Your camera is the same. To remove the parallax, you have to rotate the camera around what’s called the no-parallax point, or NPP.
Really Right Stuff Pano-Gimbal Head
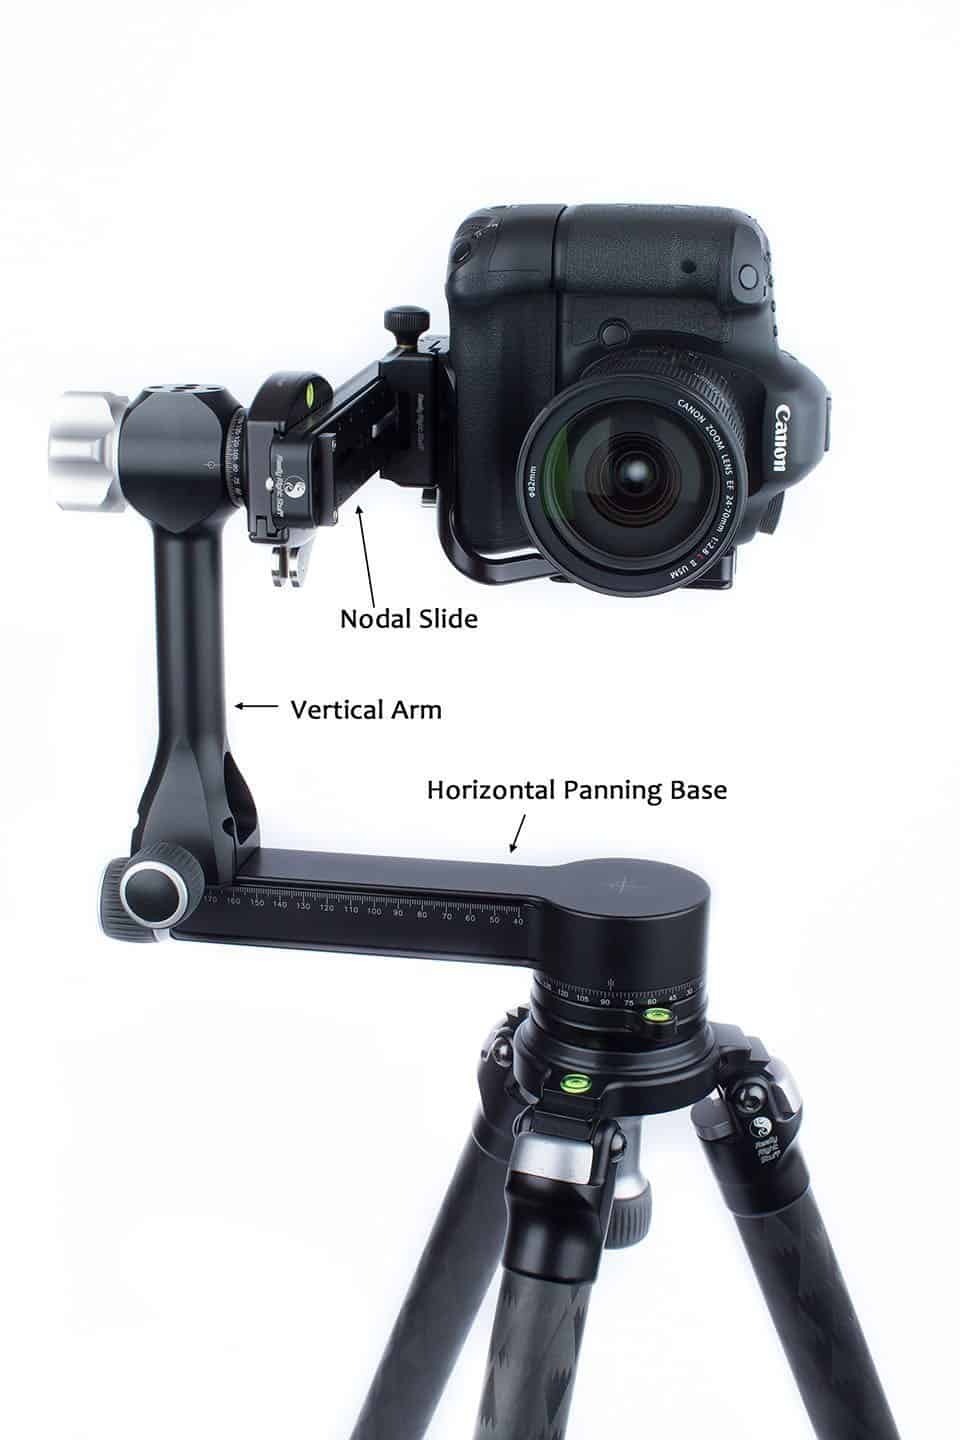
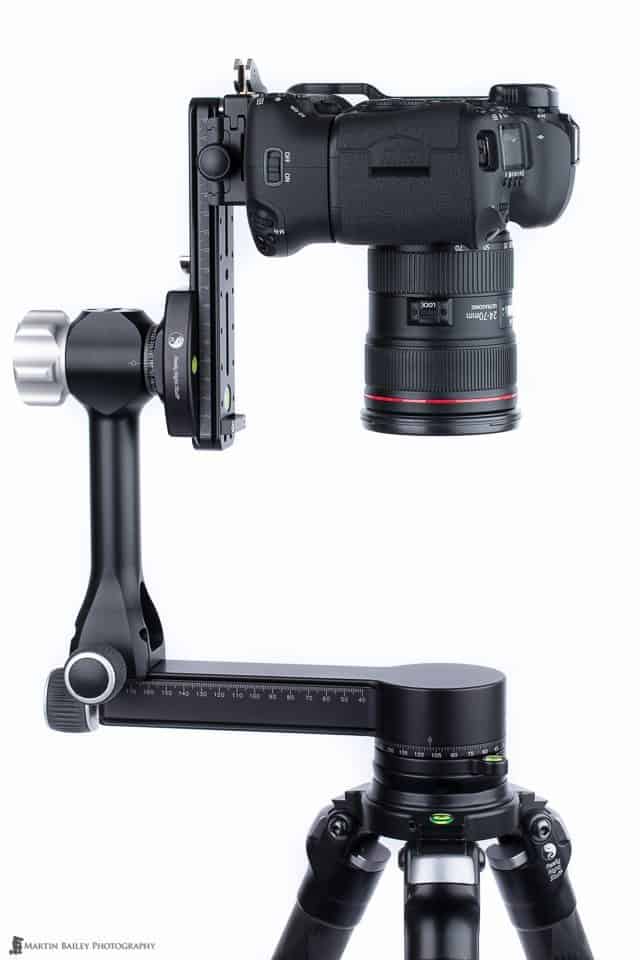
To rotate the camera around the NPP, consider something like the PG-02 pano-gimbal from Really Right Stuff. (Note: You also need a Nodal Slide, which is not part of the PG-02 package.) You might recall that this is what I use as my gimbal head when shooting wildlife with long lenses, and with the addition of a Nodal Slide that you can see in this example photo (right) it works very well as a pano-gimbal head to help me to avoid parallax.
It doesn’t remove parallax automatically of course. There are some precise setup steps that you have to follow each time you use it, which include sliding the camera back and forth in the nodal slide to an exact point for each focal length, based on the following tests, which we’ll look at now.
Setting up the Pano-Gimbal
First we need to set up the gimbal head. I’ll use the process for my RRS PG-02 Pano-Gimbal as an example, but this will of course vary depending on the gear you use.
It’s quite large when assembled, so I generally keep it broken down in a LensCoat Really Right Stuff Gimbal Pouch (below) while traveling to a location. The instructions are the same for either setting up the pano-gimbal in the field and setting it up to carry out your tests to find your key no-parallax points.
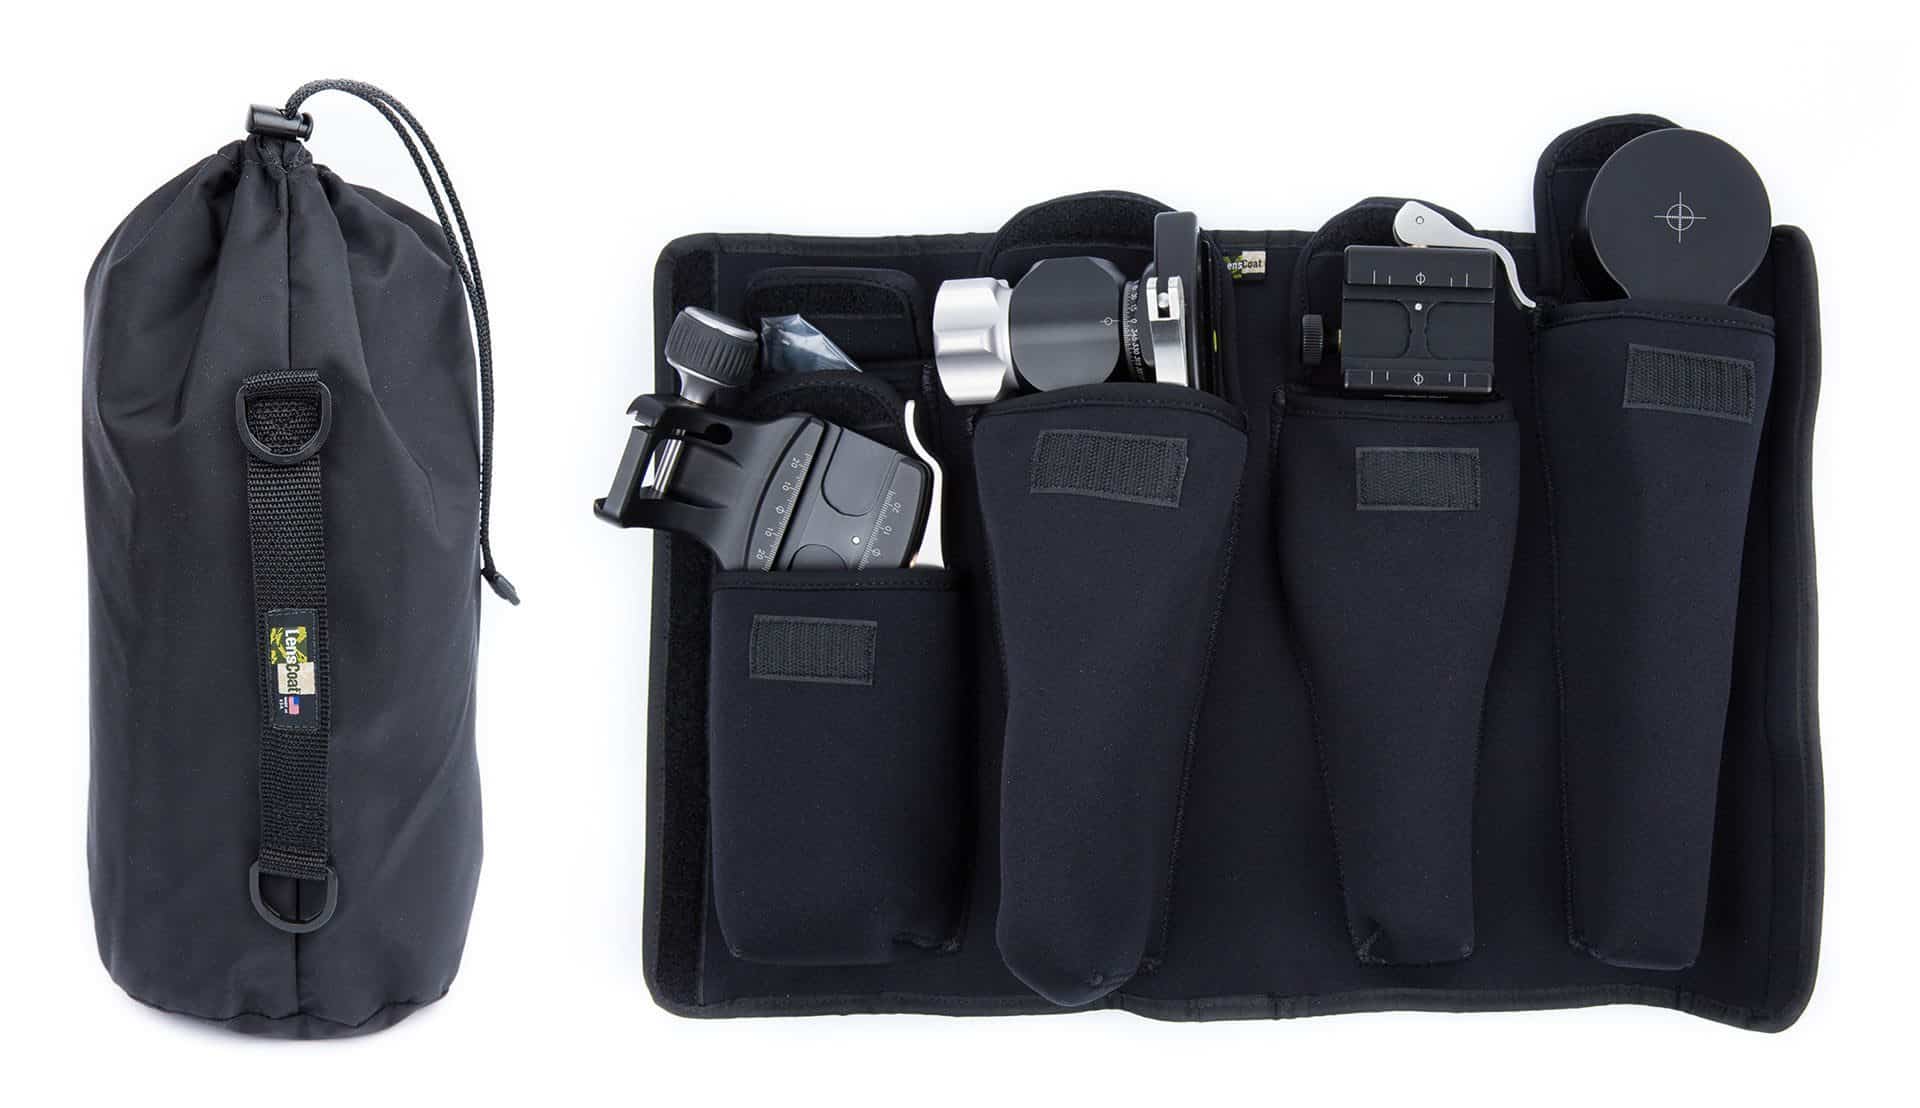
LensCoat PG-02 Pouch
Before we start, we need the tripod level, using some of the methods we mentioned earlier, then fit the Horizontal Arm of the PG-02 pano-gimbal, and check that it’s level with the built-in spirit-level.
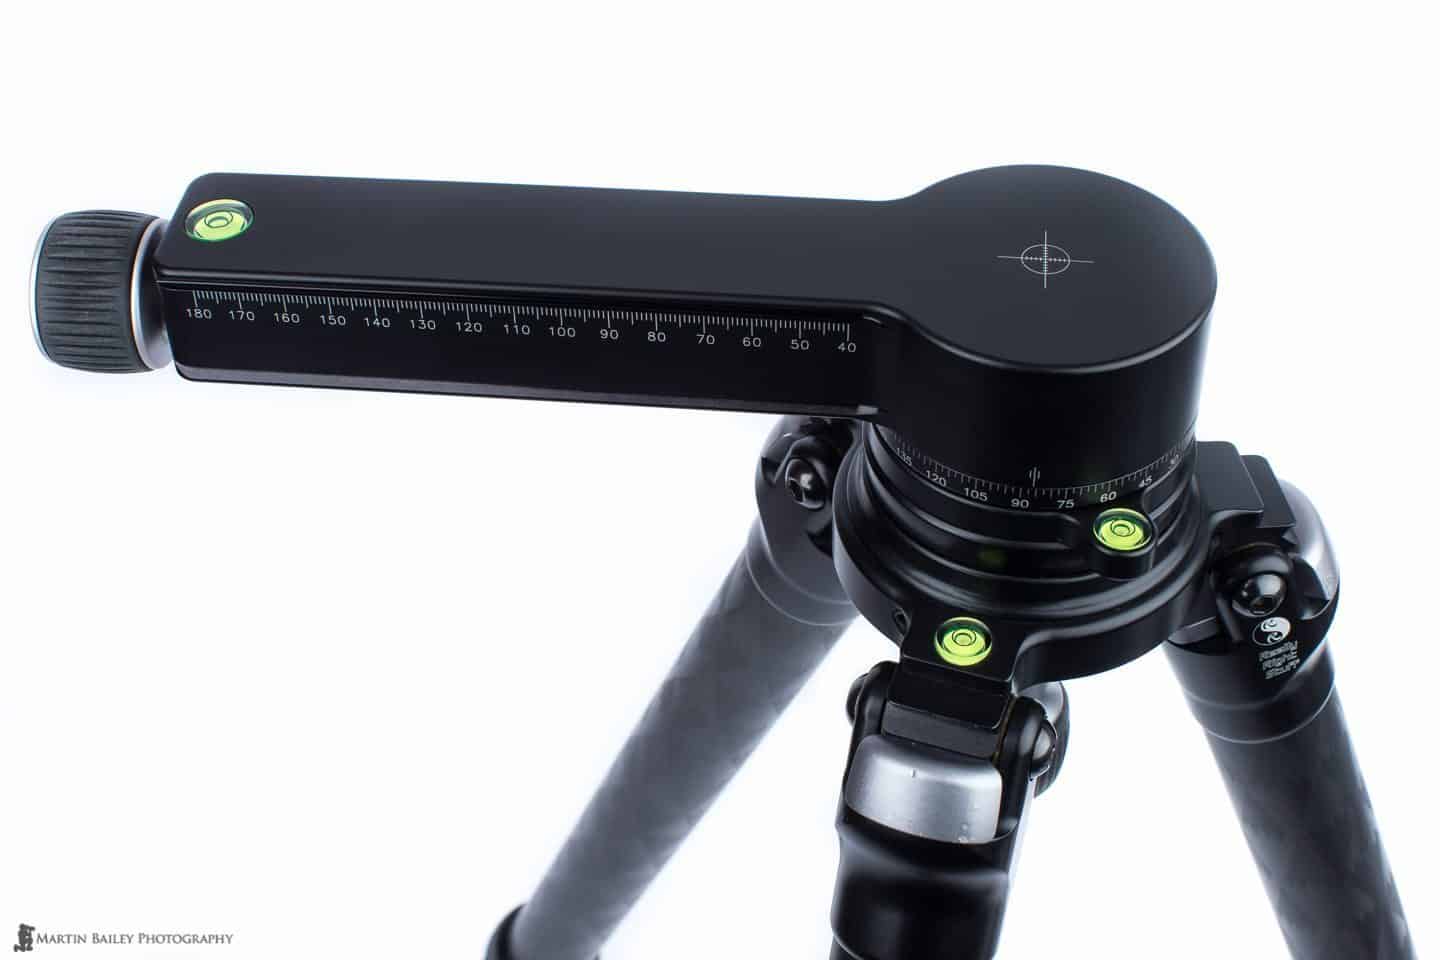
RRS PG-02 with Horizontal Arm
Next, fit the vertical arm and nodal slide that we saw in the earlier example photo. If you have a battery grip on your camera, fit the vertical arm hanging slightly over the end of the horizontal base: there’s enough room for this configuration. Ensure that the camera is aligned with the registration marks on the L-bracket so that you know your camera is horizontally in the middle of the setup.
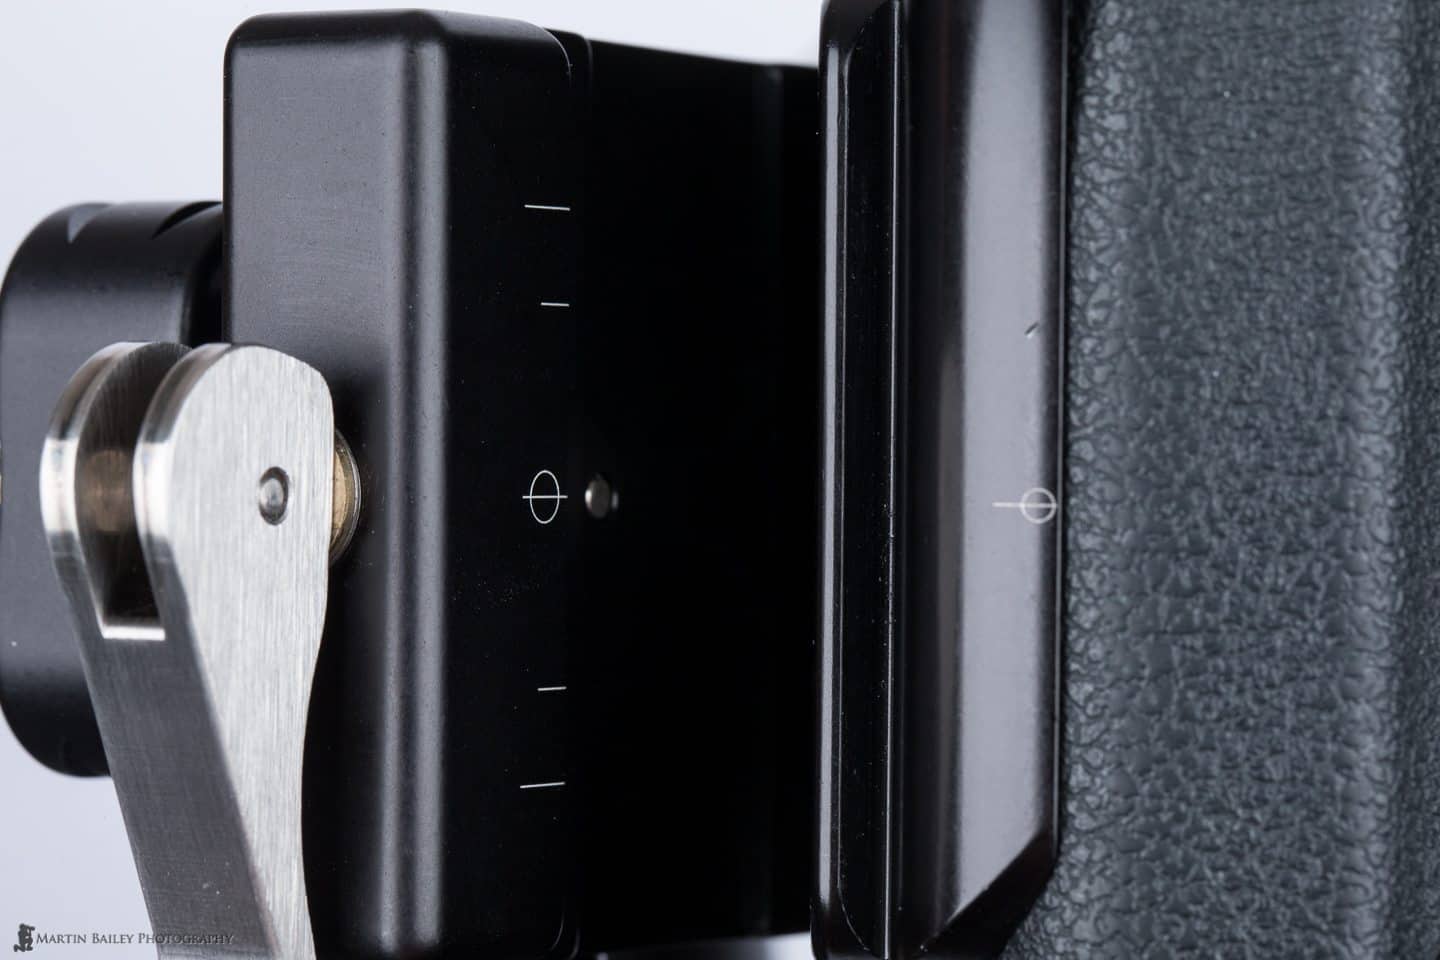
RRS L-Bracket Registration Marks
The next step is to ensure that the camera is aligned with the rotation axis of the tripod. Point the camera straight down, and looking either through the viewfinder or using Live View zoomed in, focus the lens at the minimum focus distance, then stop the lens down to f/16 or f/22 and press the depth of field preview button. This is usually enough for you to be able to see the registration crosshair in the center of the horizontal panning base. Now adjust the position of the vertical bar on the horizontal bar until the crosshair is in the center of the frame, as you see in this photo (below).
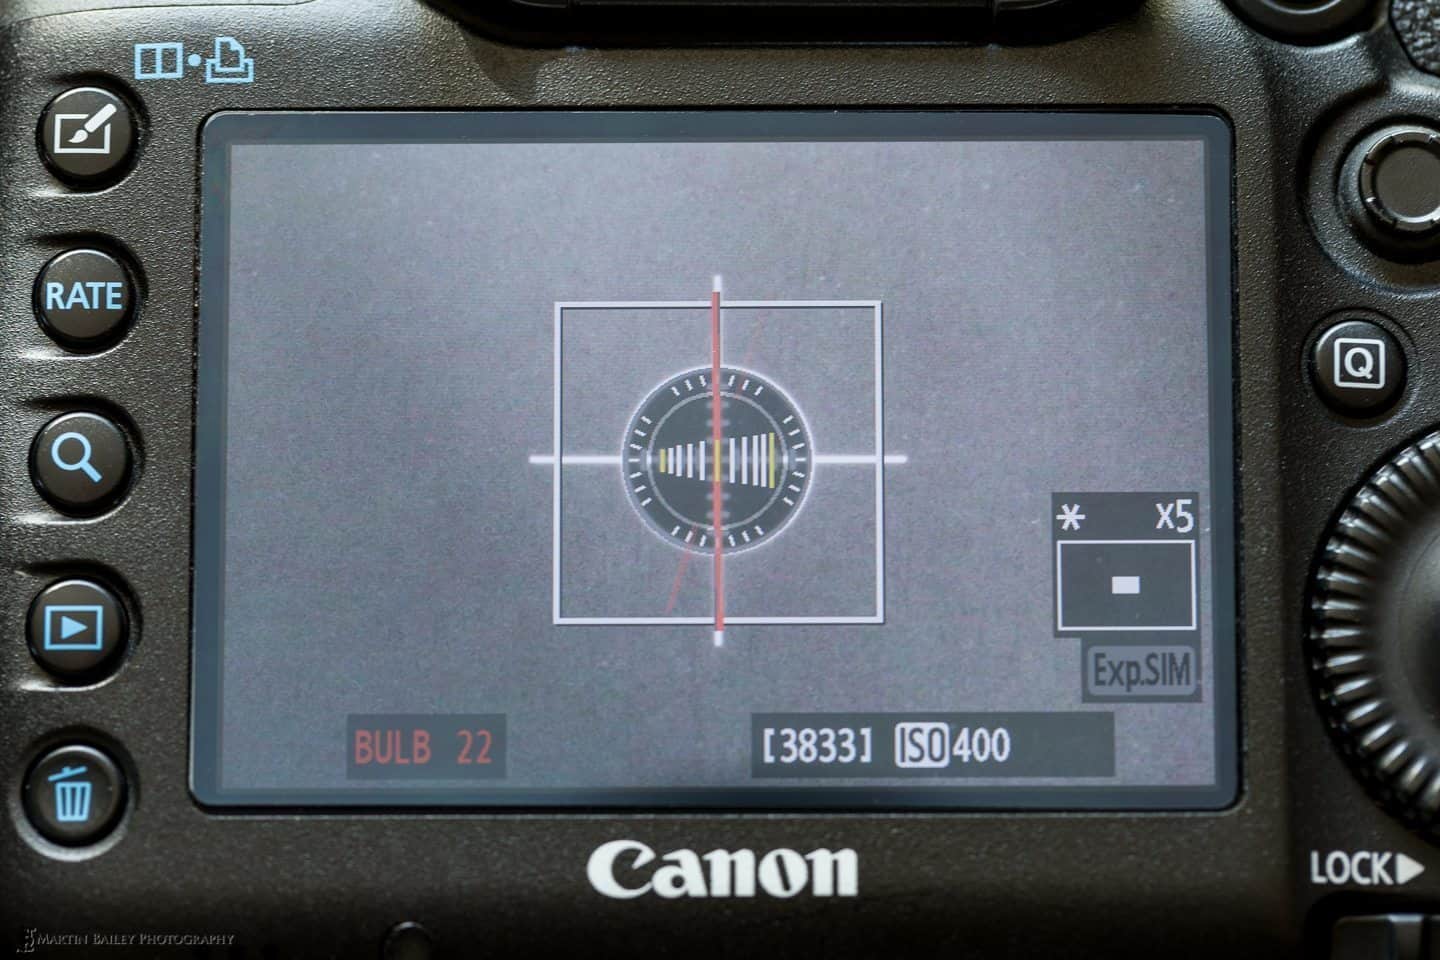
Aligning with the Cross-Hair
Camera Aligned with Cross-Hair
In this photo (above), the white square, digital level and red line are in the camera via Live View, and the white cross and white circle around the digital level’s black circle are the registration crosshair on the pano-gimbal’s horizontal panning base, being viewed via Live View.
To help you to visualise this, here’s a photo of the camera in the Pano-Gimbal head while pointing straight down at the cross-hair in the centre of the horizontal base (right).
Next, we’ll look at two methods for finding the No Parallax Point (NPP) for the key focal lengths of your lens, which will be at certain distances on the nodal slide, which is how we move the camera back and forth. There are two commonly discussed ways to do this: one is more fun, but, in my experience, not quite as accurate as the second method we’ll look at. Let’s do the more fun one first though.
Finding the No-Parallax Point – Method #1
The first method involves looking into your lens with the aperture stopped down, with a bright light (like a window) behind the camera, shining back through the viewfinder and aperture. Basically, when you have the camera at the correct point on the nodal slide, the bright spot that you see in the lens will remain perfectly stationary as you move the camera around.
A Bit of DIY
To check for movement in the bright spot of light, I recommend using a sight if you don’t have a second camera, but if you do have a second camera, set it up on a sturdy tripod pointing at your first camera, and we’ll use photographs of the bright dot to find your no-parallax point. If you have to make a DIY sight, it can be as simple as a rectangle of cardboard with a “V” and a groove cut into it as we see in this photo (below).
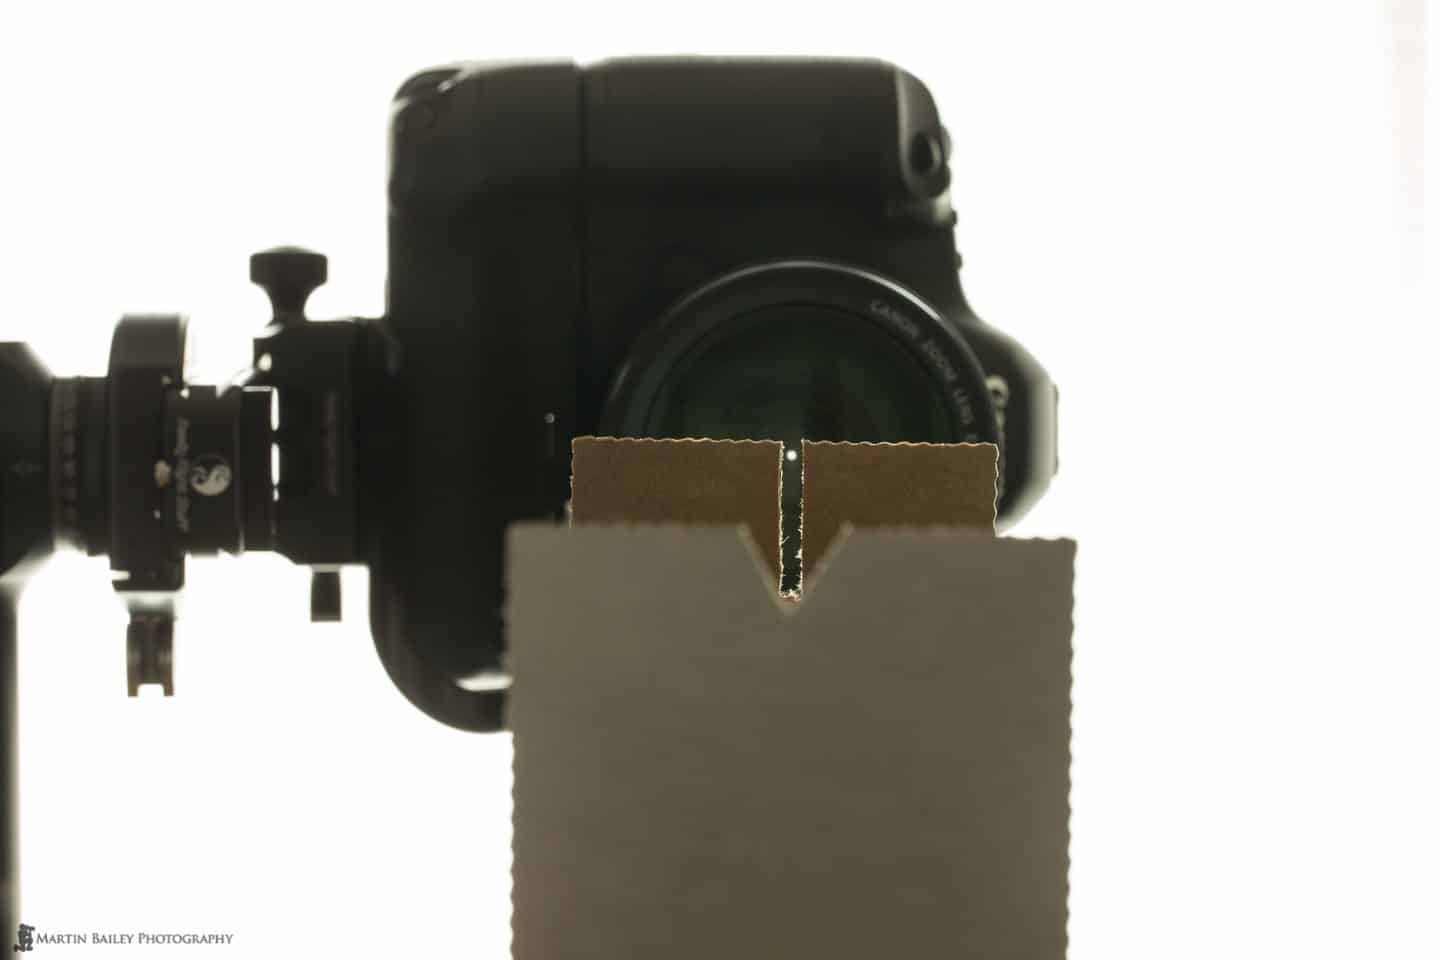
NPP Testing With Sight
Just bend the cardboard around, tape it at roughly 90 degrees on either end, and then fix it to the top of a stand such as an old tripod or light stand.
With your camera facing you with the bright light source behind it, set your aperture to f/16 (if it isn’t already there), and for the test, hold down the depth of field preview button while rotating the camera on the pano-gimbal. This can be somewhat difficult to do, here’s a bit of a secret to help with this test. With most DSLR cameras, while holding the depth of field preview button, if you push your lens release button and turn the lens slightly, when you let go, the aperture will stay stopped down, where it needs to be for these tests. Just be sure to click your lens back into place when you’ve finished the tests. If you forget to do this, the lens could work loose and fall out of the mount later, and we don’t want that to happen.
Now to actually find the NPP, rotate the camera to the right then left, and while looking through your sight or shooting test shots with a second camera, check to see if the spot moves left or right. This photo (below) shows what you’ll see if the camera is too far forwards, and needs to be moved backwards in the nodal slide. As a guide, if the spot moves outwards as you swing it to the left or right, the camera is too far forward and needs to be moved backwards on the nodal slide until the spot stays in the exact same place when the camera is swing sideways.
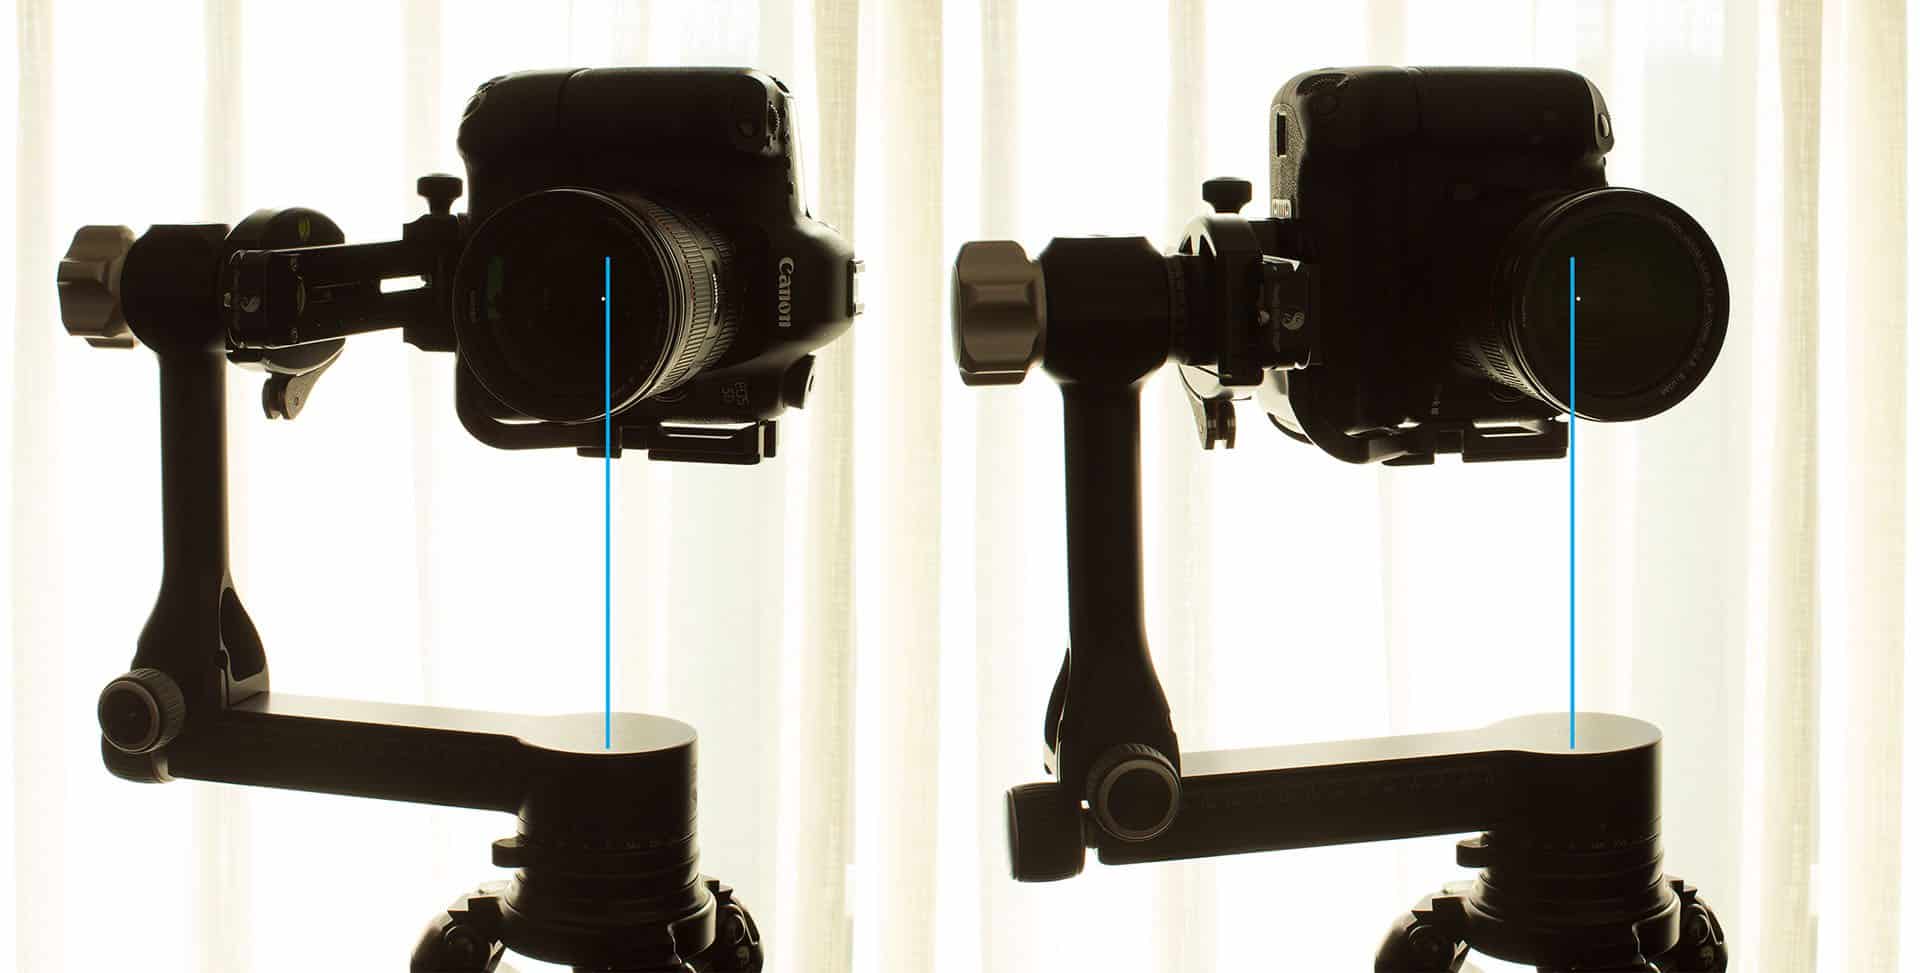
NPP Testing – Camera Too Far Forward
Conversely, if the spot moves inwards, in the opposite direction to these examples as you rotate the camera, the camera is too far back and needs to be moved forwards in the nodal slide.
As we can see in this diagram (below) the spot of light moves this way because it needs to be directly over the rotation axis of the tripod for your camera to be set at the no-parallax point. If your camera is too far forward, the spot is in front of the axis and so it swings outwards, and if the camera is too far back, it’s behind the axis, and so moves inwards with the rotation of the camera.

No Parallax Point Adjustment Diagram
It might take a few adjustments, but you can gradually move the camera back and forth on the nodal slide until the spot of light remains stationary as you rotate the camera from side to side. If fact, once you have the camera at the correct point on the slide, you should be able to move it in any direction, up and down as well as side to side, and the spot of light will remain stationary, as we can see in this animated GIF that I created from nine photographs of the camera in various positions.
Finding the NPP with a Bright Window
You can find your no parallax points relatively easily using the sight method, but I found that photographing the camera as in the examples shown here, and then zoom in on the image in playback mode on the camera’s LCD, then switching between images to check for movement of the bright spot works the best. It’s just easier to see if the spot is moving than when using a sight.
Finding the No-Parallax Point – Method #2
The other method I use to locate my NPP is to put an object like a tripod or a studio light stand about three or four feet in front of my camera. Then, with the camera focused on something in the distance and the aperture stopped down to f/16 or f/22, I shoot two photos. In the first photo, I rotate the camera to the right so the light stand is close to the left edge of the frame, and in the second photo I rotate the camera left with the light stand near the right edge of the frame.
I do my rough alignment, with the camera in Live View mode so that I can see the foreground object moving as I rotate the camera, but then when I think I’m close, I shoot an image at each extreme and then zoom in and check by moving back and forth between the two images on the LCD.
NPP Light Stand Tests

RRS Nodal Slide at 160mm
You might find that you have to adjust and reshoot a few times, but it’s pretty easy to find your no-parallax point after two or three adjustments once you get used to this. This photo (above) is a 100% crop from two test shots.
See how the light stand remained almost completely stationary as I rotated the camera right to left. So this is actually a photograph with the light-stand on the far left of the frame, when the camera is rotated to the right, and on the far right of the frame, when the camera is rotated to the left, and we can see that the camera is at the no parallax point, because there is no parallax shift in these resulting photographs.
Record and Repeat
Of course, you have to record the position at which you have your camera in the Nodal Slide for each focal length, so that you can set your camera at the NPP easily in the field as you shoot for your stitched panoramas.
How you record your measurements will depend on your nodal slide, and although there have been attempts to standardise these measurements to enable easy sharing of data, I generally find it easier to just test myself and note my results, as shared below. Firstly, I always set my camera clamp at 160 mm on my nodal slide, and leave it there (right).
This means that all of my NPP measurements can be jotted down with easy value pairs such as 24 mm = 45.5 mm, 28 mm = 47 mm, 35 mm = 51.5 mm, etc. The first value is the lens focal length, and the second value is the point at which I have the nodal slide attached to the quick release clamp on my vertical arm (below).

RRS Nodal Slide at 48mm
Knowing these measurements means that I don’t have to find my NPP afresh every time I set up the pano-gimbal in the field. I just have to ensure that my camera is directly over the rotation axis of the tripod by pointing it straight down and adjusting, and then set the camera to these measurements on the nodal slide, and I’m good to go.
Keep Your Notes Handy
I find and note the NPP for all focal lengths etched on the lens, as they are easy to return to in the field. I then add my measurements as a note on my computer, which automatically synchs to my iPhone. You could also write it on the back page of a shooting journal, or whatever you have with you in the field. The important thing is to have something like this list with you when you need it.
- 24-70 mm f/2.8L II @ 24 mm: 160-48 mm on nodal slide
- 24-70 mm f/2.8L II @ 28 mm: 160-50 mm on nodal slide
- 24-70 mm f/2.8L II @ 35 mm: 160-55 mm on nodal slide
- 24-70 mm f/2.8L II @ 50 mm: 160-67 mm on nodal slide
- 24-70 mm f/2.8L II @ 70 mm: 160-78 mm on nodal slide
Shoot Your Series of Frames
Whether you are shooting hand-held, on a tripod with a ball head or with a full pano-gimbal setup, once you are ready to shoot, it’s generally best to start at one extreme of your scene, include a little more than you think you’ll need in your final photograph, and start to shoot a series photos moving a half to two thirds of a frame at a time. The overlap is necessary to help Photoshop or other stitching software to line up the images. If you shoot multiple rows of images, ensure that you also have at least a third of the bottom of your image overlapping the top of the previous row, or vice versa.
There are techniques for using the degree engravings on the pano-gimbal or tripod heads when shooting for stitched panoramas, and I’m sure there are benefits to doing this, but I do this by eye most of the time. Note though that it does help to lock down the vertical movement of the tripod head as you move the camera horizontally to stop your frames from drifting up or down.
To finish, here is a series of photos which we used in my example workflow in my Striking Landscapes eBook. The scene captured here is Ashino Lake with a Shinto Gate (Torii) and Mount Fuji in the distance, and was shot with a single line series of images at 135 mm. The edges of each overlapping photograph is highlighted in Photoshop. You can see here too that although I was really careful getting everything level, the images did drift up slightly as I made my series of exposures.
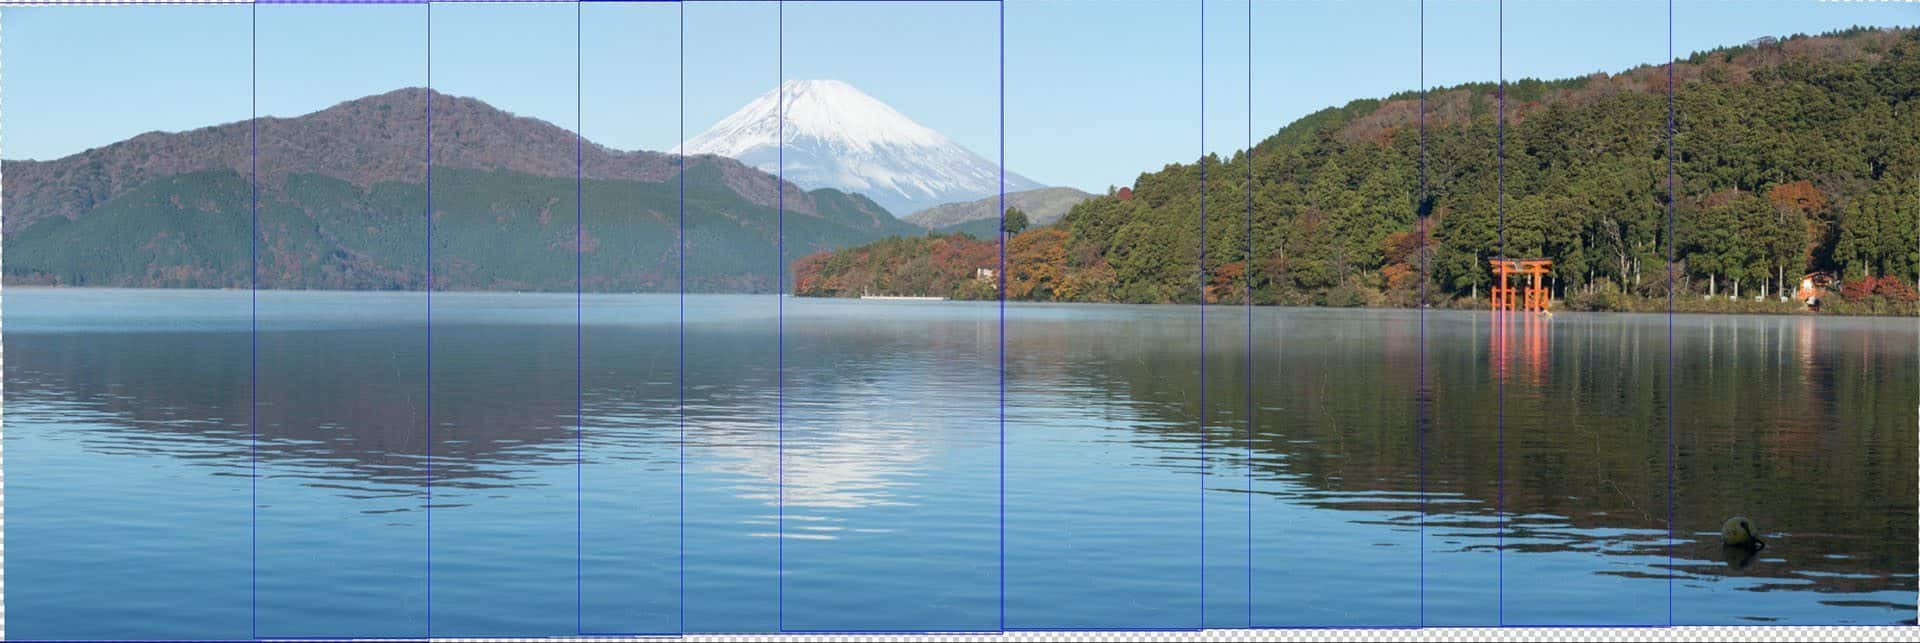
Pano of Mt. Fuji with Photo Edges
In Striking Landscapes we go on to walk you through how to actually stitch these images together in Photoshop, but we won’t get into that today. As I said earlier though, at some point we’ll touch on this, and I’ll probably introduce a new piece of software that I’m using now, as well as recapping on Photoshop as well possibly. Either way, I need a little more time to prepare for that, so we’ll finish here for today, with the techniques necessary for finding your no parallax points, and actually capturing your images for stitched panoramas.
Show Notes
Pick up Martin’s Striking Landscapes eBook here: https://mbp.ac/cvsl
Find Really Right Stuff here: http://www.reallyrightstuff.com
Subscribe in iTunes for Enhanced Podcasts delivered automatically to your computer.
Download this Podcast in MP3 format (Audio Only).
Download this Podcast in Enhanced Podcast M4A format. This requires Apple iTunes or Quicktime to view/listen.


We don’t all have pano gimbal heads. U Might also mentioned using a focusing rail to center the nodal point over the center of rotation of the tripod head.
Hi Tom,
You know, I like to talk from my own experience, which is why I don’t necessarily cover all possibilities. Besides, not everyone has a focusing rail either, right? 🙂
Cheers,
Martin.
First things first.
Thank you for your podcasts, I quite follow them and I always found them quite interesting.
For this topic I have a couple of questions:
How importan is the parallax problem related with the distant to the subject you are taken pictures of ?. May be for the Mt. Fuji picture there is no difference.
How much have the fixing of parallax shift increased the quality of the images ?.
Thanks forehand.
Thanks for following the Podcast Rafael.
In the example photo, parallax errors would pose virtually no problem. Apart from anything else, it’s water, which is moving anyway, but even if it was solid ground, it would not really be an issue. Parallax become more of an issue when you have close foreground objects in the scene. When you do have close objects though, it makes stitching much more accurate, and you’ll see less artifacts where the software tries to match elements together.
Cheers,
Martin.
A great podcast Martin, and thanks for the write up here on the site, will read it as soon as I can. Is all this covered in your e-book?
Thanks
Carey
Thanks Carey!
Yes, this is all in my ebook, but we go on in later chapters to talk about the computer processing as well. I’ll get to that at some point here too, but it won’t be for a while probably.
Cheers,
Martin.
Hi Martin,
Thanks for doing this great podcast. Very informative and concise. I like the gif as it showed me visually your message. I will try a panorama with you in Hokkaido.
Vik
I didn’t know about that LensCoat pouch, great idea!
It sure is Aaron. It makes traveling much easier. I’m glad you like that one. 🙂
Hi Martin
Great article!
I shot some images on a recent holiday (7 or 8 images per pano) and I could not get Lightroom CC (the latest version) to stitch them. I imported the same images into Photoshop and it seemed to work fine. I have tried various forums (Adobe and other) and nobody has come back with a reason other than check my software version(s)/re-install (or similar).
Thinking about it, the most problematic group of images most likely would have had significant parallax problems; I had close up and distant objects, I was in a rush, and didn’t take much care :). In your experience, would this be more likely to cause artefacts or do you think it may be a possible reason for Lightroom to not stitch? The really confusing thing for me is that the stitching worked in Photoshop but not Lightroom.
Hi David,
I’m pleased you found this article useful.
I haven’t done any pano stitching in Lightroom for a while, as I jumped ship to Capture One almost a year ago, so I can’t say how good Lightroom is at stitching at the moment. I have noticed that there is often a difference between Lightroom and Photoshop though, and sometimes only one does a good job, and other times the other application works better.
It is almost certain though, that in this case, it’s the parallax that caused Lightroom to give up the ghost. I imagine the premise is (on Adobe’s part) that in Photoshop you have tools such as layer masking, that would help you to clean up the artifacts, but they are not available in Lightroom. It’s quite good really, as they don’t dump you with a file in Lightroom that you can’t fix.
Sorry I can’t be of much more help, but I imagine that this was a conscious decision on Adobe’s part, and probably the right decision.
Regards,
Martin.
Thanks for the prompt response, Martin!
I’m pleased to hear that you’d noticed a difference between LR and PS as I thought they might process panos in the ‘same way’ . Anyway, I’ve only recently learned about parallax (assisted by your blog post); so, hopefully this is a moot point.
Regards,
David
You’re very welcome David. I’m happy to be able to help.
Good luck with your future panos.
Great tips thank you Martin. Kind regards
Alessio
You’re very welcome Alessio. I’m pleased you found this useful.
Thanks Mr. MARTIN BAILEY for the informative article about shooting pano with RRS Pano-Gimbal to avoid parallax issues. I’m landscape and capacities photographer and I have a wide angle lens. I need to shoot city escape and show the the tall towers vertical (architectural) without distortion using multi row panorama technique. which is the ideal solution (1) shooting multi-row pano using RRS Pano-Gimbal and normal lens or (2) using a tilt-shift lens to get very correct perspective. and please advise me whether method (1) or (2) gives the same results? or not? and why?
Hi Mohamed,
Thanks for stopping by.
Using the techniques I cover in this post will not correct perspective. Even if you remove the parallax errors, the results of a stitched photograph are just the same as what you’d get if you used a wider focal length lens.
The only way you can remove the distortion in tall buildings is to use a tilt-shift lens, as you say. Or you can remove it to a degree in Photoshop, but doing that too much will reduce the image quality, so a tilt-shift remains the best option.
Regards,
Martin.